


Congratulations to Javier Sotomayor, November 2023 PFRE Photographer of the Month! The theme this month was "Open." Javier Sotomayor - Entry #879 Dave Koch - Entry #877 Peter Wingfield - Entry #874 Here's what Javier has to say: Hello First of all I wa ...


As an Amazon Associate we earn from qualifying purchases.
There may be instances where you need to remove unwanted objects or people blocking an otherwise perfect interior or exterior shot. Learning how to remove objects in Lightroom will keep your real estate photos spotless and ready for posting.
Quick Navigation
You can use the Content-Aware Fill, Clone, and Healing Brush tools to remove objects when editing in Lightroom. These tools enable you to mask and remove unnecessary objects from the image. The sampled pixels will merge with the original pixels to eliminate or hide the distracting objects.
Your target is to keep the viewer focused on the key aspects of the property, like design and dimensions, instead of any unwanted objects. Any unwanted objects can steer the viewer's attention away from the property. The good news is that removing unwanted objects is very easy if you use Lightroom to edit your images.

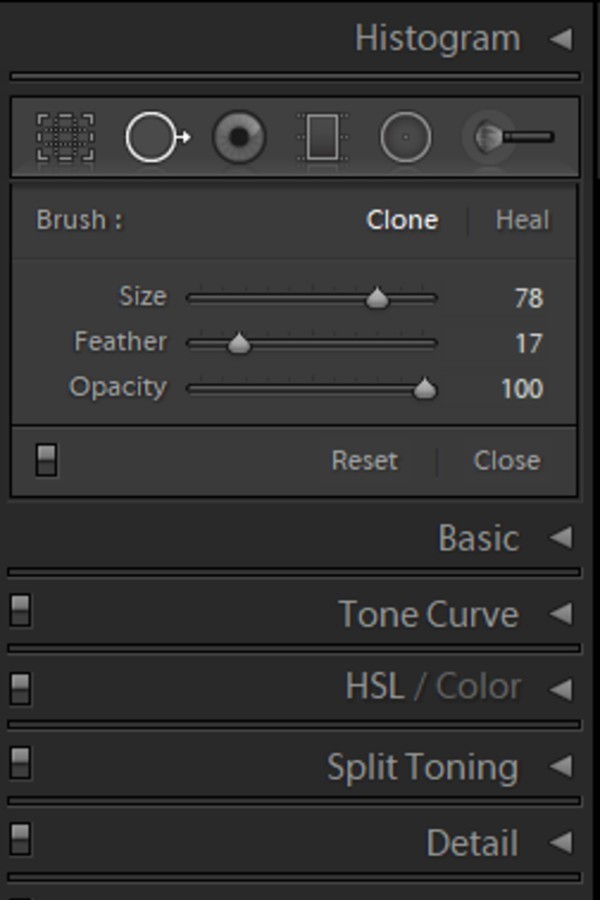
Besides absolute organization and AI-powered autoprocessing, Content-Aware Fill is another robust feature of Lightroom Classic CC. The Content-Aware Fill tool in the Develop Module can help remove distracting objects in minutes. You can see it right next to the Crop tool below the Histogram.
Lightroom's Content-Aware Fill works by replacing a particular section with an unwanted object with a nearby matching section in the image. Lightroom lets you form a selection around the object. It automatically selects a sample selection from nearby to clone or heal the area.
The tool provides optimum control with brush size, feathering, and opacity features. For this example, I'm removing a light switch on the wall.

If the image is simple enough, you can use a big brush size to do the work quickly. However, images with closely placed details need a smaller brush size.
Press the left square bracket key [ to increase the brush size. Meanwhile, press the right square bracket key ] to reduce the brush size.
The Feather level decides how hard the effect of the brush will be. Meanwhile, the Opacity slider determines the object's transparency you want to remove.
Select the area surrounding the object after setting the sliders to the desired limits. You can either select by forming a circular selection or use the brush if you can't contain the object in a circle. Wait for Lightroom to apply the pixels.
When you select unwanted objects using the Brush or Elliptical tool, Lightroom will automatically find a place closer to the object to replace it. Most of the time, Lightroom does a satisfactory job choosing the source. You can drag the selection to another place you deem suitable.
In the image below, Lightroom selected a matching source. However, I had to adjust it to align with the wall panels.
After matching the source spot, the tool works in two ways. You can either use the Clone or Heal tool to modify the edit.


The clone tool copies the exact pixels from the source and swaps the distracting object with it. Switch from the Healing Brush settings from Heal to Clone if you notice a smudging effect. To delete a clone adjustment, choose the blue pin overlay.
Next, press the Delete button (Mac) or Backspace (Windows). The Clone tool will copy and paste pixels from one section to another.
If you choose the Heal tool to remove unwanted objects, Lightroom will try to swap the selection with matching pixels to blend in the area. Whenever you clone or heal using the spot removal, it shows a pin on the edited portion.
Press the H key on your keyboard to hide or show the pins to remove that. You can now see that the LED TV is gone from the image.

You can find the Visualize Spots tool below the workspace in the Develop Module. Tick the checkbox for Visualize Spots to see any dust spots you missed while editing.
Lightroom will turn the image black and white, making it easy to view the spots. Move the slider to various contrast levels to better see the unwanted elements.
You can remove objects from a photo in the Lightroom mobile app using the healing brush tool. You can find these tools at the bottom of the screen after you tap the Healing icon in the Edit panel in the Loupe view.
While there is an eraser in Lightroom, you can't use it to remove objects the same way as the Healing Brush. You can only use the eraser function to remove the areas where you've put a brush effect.
Particularly for real estate photographers, you need to remove objects in images using Lightroom's Content-Aware, Healing Brush, and Clone tools to avoid distractions. Your finished outputs should be free from blemishes, allowing viewers to focus on an element or subject that will sell the property.
It's common to encounter unnecessary things when shooting properties. You can experiment with Content-Aware Fill, Healing Brush, Clone, and Visualize Spots tools to remove more complex objects in Lightroom. Once you find the best tool for your process, you can improve your editing techniques and keep your real estate photos flawless.


