


Congratulations to Javier Sotomayor, November 2023 PFRE Photographer of the Month! The theme this month was "Open." Javier Sotomayor - Entry #879 Dave Koch - Entry #877 Peter Wingfield - Entry #874 Here's what Javier has to say: Hello First of all I wa ...


As an Amazon Associate we earn from qualifying purchases.
Suppose you've changed your camera setting back to 'fine' for better photos, yet the MLS does not allow uploads over 10MB. Perhaps you thought a photo exported at 80% would be smaller than one exported at 81%.
Exporting from RAW files to JPEG images doesn't end at using presets or manually adjusting the quality slider; you still need to know the other Lightroom export quality settings to obtain the best results.
With that said, I'm going to discuss different available settings for exporting real estate photos from Lightroom.
Quick Navigation

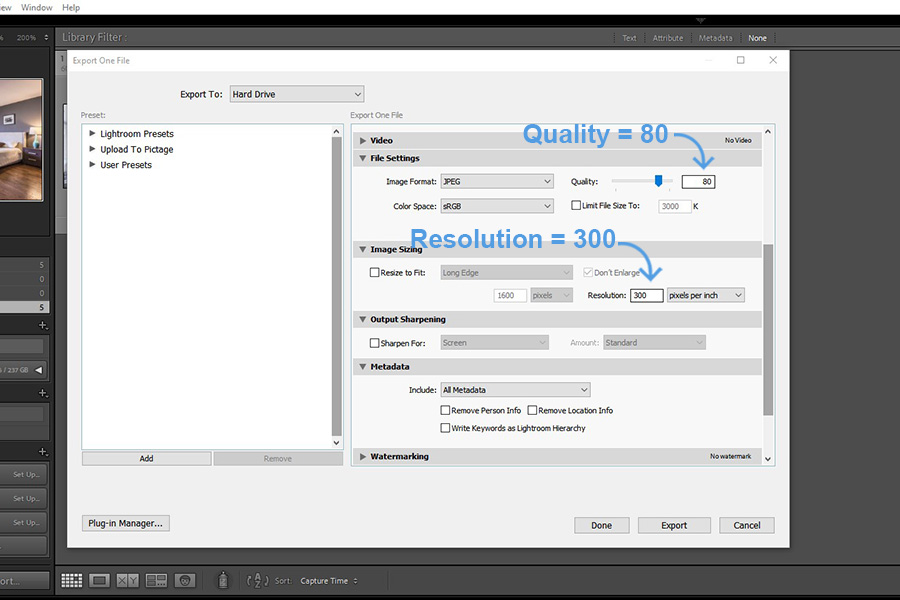
When using Lightroom, the ideal export quality settings for print would be setting the quality slider at 80, which would equate to the same quality of 100. On the other hand, you can export JPEGs at 65 to 70 if you're uploading photos to websites.
By adjusting the quality slider at around 80, you're freeing up 40% of the file size, preventing an image from looking bloated or larger than normal. You must also set the resolution at around 300 PPI to ensure a photo doesn't come back pixelated each time you upload or print.
Before diving deeper into the different Lightroom exporting options, you must first understand how the software's Export Images Dialog Box works.
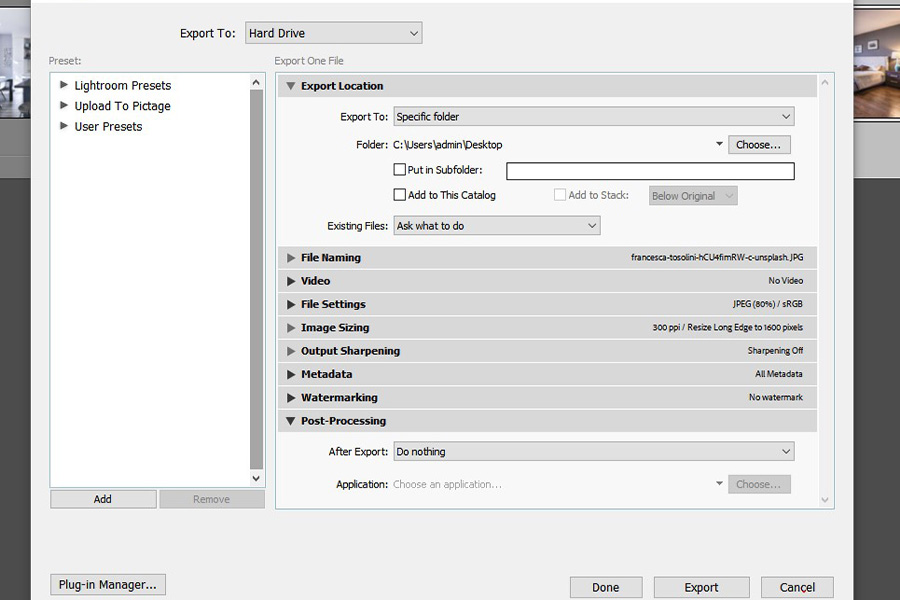
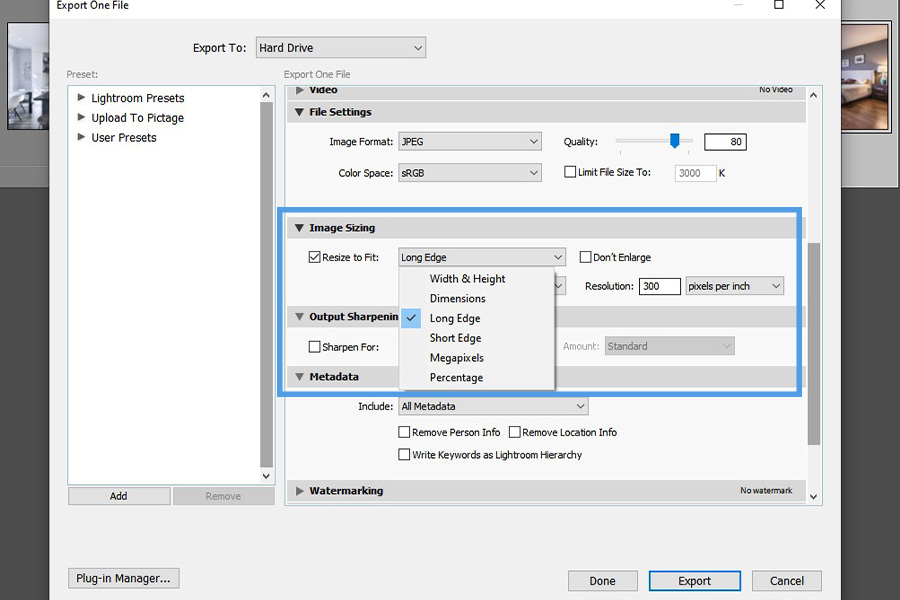
While Lightroom's export dialog affects the overall settings, the Image Sizing panel focuses on other recommended settings for changing the size of your high-resolution images.
After organizing your real estate
JPEG quality setting is the most common format used for web page uploading. First, setting the Quality slider between 65 to 80 is a good balance for file size and load speed. Another option is to check the 'Limit File Size To' box, then set something reasonable like 1KB.
After that, use sRGB for the display colors. Furthermore, some real estate and listing websites automatically resize pictures if they are too large. This is why checking a page's recommended sizes is one of the most important things you need to do beforehand, especially for MLS.
For blogs, try to keep the pixel density at around 2000 pixels for the smaller edge and 2500 for the longer edge to load images faster. While the resolution won't matter much, you can still follow the default 240 pixels. After that, click 'Screen' for the Sharpen For option.
| Setting | Selection |
| Format | JPEG at Quality of 65 to 70, no file size limit |
| Color Space | sRGB |
| Resize | Long Edge of 2500 Pixels Small Edge of 2000 Pixels |
| Don't Enlarge | Checked |
| Sharpen For | Screen, Standard |
You can select 100 quality when you want to export photos to social media sites since almost all sites will compress the files if they are too large. However, the best Lightroom export settings for Facebook and Instagram are to set the quality at around 65 to 90 for a fast loading time.
In general, the color display, enlargement, and resolution are similar to the exporting settings for websites.

Select the Resize to Fit option, then input 960 or 2048 for the longer edge. Even when saving DSLR photos for Instagram, it's ideal to change the resolution to 72 pixels per inch before sharpening a photo for 'Screen'.
| Setting | Selection |
| Format | JPEG at Quality of 65 to 90, no file size limit |
| Display Color | sRGB |
| Resize | Long Edge of 960 or 2048 Pixels |
| Don't Enlarge | Checked |
| Sharpen For | Screen, Standard |
While the maximum settings are quite similar to those mentioned above, you still need to make essential changes in Lightroom depending on where you would print pictures.
For instance, TIFF has high quality and no compression artifacts, making it suitable for critical images. Meanwhile, JPEG is much better for simple printing applications since it can produce a smaller file size with minimal image quality loss.
Take note of these settings if you want to export high-quality images from Lightroom for printing real estate photos.
| Setting | Selection |
| Format | JPEG at Quality of 80 to 100, no file size limit |
| Display Color | sRGB |
| Resize | Long Edge of 6016 Pixels Short Edge of 1200 Pixels |
| Don't Enlarge | Checked |
| Sharpen For | Glossy or Matte Paper, Standard |
Exporting to maximum image quality is one of the best ways of maintaining high-res files for storing and sharing files with a real estate client. However, this also results in huge file sizes, as opposed to what you can do for websites and prints.
Maintaining the maximum quality in Lightroom is also crucial when you know there's a chance you might need to edit the pictures again, which means you must keep all of the data. In general, the file settings, image sizing, and output sharpening are the important things you must adjust.
Unlike web and print export options, you can ignore the image format, quality slider, display color, resizing, enlargement, and resolution at the moment. Should you want to change these, you can follow the recommended settings below.
| Setting | Selection |
| Format | JPEG at Quality of 65 to 70, no file size limit |
| Display Color | sRGB |
| Resize | Long Edge of 2500 Pixels Small Edge of 2000 Pixels |
| Don't Enlarge | Checked |
| Sharpen For | Screen, Standard |
You need to resize files because most web and social media platforms don't display full resolution pictures. If the file exported is too big, you might reduce a website's performance. Likewise, the display size is essential in determining the number of pixels a photo will occupy on the screen.
Image compression involves reducing the number of bytes used to transmit or store data without affecting the size or resolution.
Also known as display color, the color space refers to your camera's selection of colors, with sRGB as the default and the most supported by any photo editing monitor. This is one of the trickiest variables because you must consider where you'll be using a photo.
This tutorial by Trevor Dayley will probably fix your problem. Trevor shows how dropping the quality slider a little in Lightroom Export reduces file size significantly without negatively impacting the quality of the image.
As a real estate photographer, you will be using JPEGs for various print and online purposes. Aside from presets, you must pick the right Lightroom export settings. Make sure to set the quality slider, select the right display color, resize, and sharpen to export the highest quality image.
Do you have any suggestions on how to deliver the best quality exported photos and still stay under the 10MB limit?


Pretty hard to justify going past 7. For sure a 10mb JPEG is a big ol' waste of space!
http://regex.info/blog/lightroom-goodies/jpeg-quality/full-res-examples
Wait wait wait wait......did the OP say he was "[changing] my camera setting back to “fine” for better photos..."?!
Garbage In, Garbage Out.
Why for the love of Pete would anyone shoot JPEGs and not RAW files? You can't shoot JPEGs and simultaneously be asking about how to have the "best" quality in your deliverables. It's like getting drugstore-kiosk prints and then throwing your negatives away. If the OP wants to have good quality, he has to start by capturing good quality in the first place, then output the deliverables wisely.
just limit file size in the export to 2.5mb
just limit file size in the export to 2.5mb
https://photos.app.goo.gl/1nZ4dyqcgerR1PRp1
I’ve changed my camera setting back to “fine” for better photos Huh?? I am afraid this gentleman has been misinformed. Use RAW, post process to liking and export to jpg with a smaller resolution. Problem solved.
I would love feedback on our process:
We shoot in RAW on 5dMk3
My shooters prep the photos with a few major edits, and then export to TIFF at 2500x1800, 240ppi
My editor imports those, edits them, and then exports to two folders of jpegs: MLS 1280x960, 240ppi, 70% quality, Print 2500x1800, 240ppi, 70% quality
We end up with files around 200-500kb for MLS, 600-1500kb for print
Does this sound reasonable?
We recently changed from Dropbox to Google Drive for delivery and we are saving some money, and it seems to be working great for my clients and team.
Since, it came from Scott shooting in raw is the winner. Thank you.
If shooting in .jpg, why even use Lightroom. Lens correction profiles are designed around RAW. Ever noticed when attempting to apply a profile, if it actually has the camera listed it won't have the lens as you try to manually match up the combination that Lightroom wouldn't auto-read. Think of it this way...RAW is RAW, .jpg is the auto mumbo jumbo application the manufacturer developed for out of camera presentation and any fine tuning (brightness, contrast, cropping etc) can be done with the free software provided by the manufacturer.
I shoot in RAW, edit in LR/PS and export as JPGs from LR with the JPEGmini Pro plugin. All my files are downsized and compressed with no loss of quality.
http://www.jpegmini.com/pro
I use WE Transfer https://wetransfer.com/ it's free
ALWAYS shoot RAW... process in your favorite editor... export as JPEG.
Our MLS (like all the rest of them) have a max file size (resolution, etc). Not sure what part of NJ you are from, but here in the Philly Metro area it's TREND (BrightMLS). They recommend 1440 x 1080 at 96ppi. So I set Lightroom to export at that size and have NEVER had a file-size issue. And I only export at that one size... as it works fine for print, web, etc.
@peterleon -- I use WeTransfer also, but it won't re-size photos to make the file size smaller.
@Steven -- Shooting RAW is just a basic good practice, so if you're concerned about the quality of your photos that'd be an obvious first step. But it won't address your issue of file size, for that see any of the good links people have provided.
I'm getting the impression that the OP is delivering the images straight out of the camera with no post processing. If that is the case, there is no value added to the customer. The OP is also not extracting the full measure of the camera's capability either.
There are only three primary reasons I shoot in .jpg. If I'm making images for Reuters, they require them to be shot in .jpg (silly, I know). If I am taking photos at an amateur rocket launch, I shoot in .jpg so I have enough room in the buffer for more frames. Lastly, I use small .jpg's for eBay images since I'm in controlled studio conditions with lots of light and the images don't need to be as good so I'm left with small files that I don't have to do anything to.
I deliver 5 galleries to my RE customers. Each one has the pixels dimensions that match the maximum display size for each web site they are intended for. It only takes a minute or two (plus processing time) for Lightroom to create the galleries from presets I have made. I see it as a very cheap way to add value in my customer's eyes. Delivering 10mB image files would mean that my customers would have to further process a .jpg image to the detriment of quality. They are also not likely to have staff that are versed in image processing to the extent that I am.
Shoot RAW and then output the images from a program such as Lightroom in the format and size that the customer needs to market the property.
Shoot in RAW. Export in Lightroom. 92% looks exactly as 100% and the file size is much better. I get my JPEGs down to 1-2 MBs each maximum for issue.
Rick McEvoy - http://rickmcevoyphotography.co.uk/
For the MLS I export out at 100% at 1080 on the long side. Then I grab the whole set and toss it in JPEG Mini to crush it down the most possible without losing quality.
Another mention for JPEG Mini Pro. I send Realtors two sets of JPEG's from Lightroom - 1850 px for Internet - 3500 px for print. I export directly to Dropbox from Lightroom, the drag to Mini Pro which resaves in the Dropbox folder. The larger photos go from 3 mb or so to 1.5. Saves me tons of space.
I want to thank everyone for the feedback. Most of it was constructive. I spent the last 2 weeks really learning to use Lightroom and my last 4 shoots were RAW using lightroom. I have changed my workflow for the better and I want to thank everyone. One final note, I'd say 99% of my customers only use the photos for MLS so I no export them to match the MLS at 1280 x 960.
One more comment.... I have tried several delivery methods for my photos and now find that since I have Amazon Prime, this is the an easy method for the end use to pull a one click download so I now use Amazon Photos for my delivery.
I use 1860 x 1240, 300 dpi and the size is around 550 kb. This is the size I send realtors to use on all web, MLS and social media. I even tried it for my photos on my website and they are crystal clear when blown up on my 32 inch screen. They load super fast and look amazing.