PFRE is the original online resource for real estate and interior photographers. Since 2006, it has been a community hub where like-minded professionals from around the world gather to share information with a common goal of improving their work and advancing their business. With thousands of articles, covering hundreds of topics, PFRE offers the most robust collection of educational material in our field. The history of real estate photography has been documented within these pages.
Congratulations to Javier Sotomayor, November 2023 PFRE Photographer of the Month! The theme this month was "Open." Javier Sotomayor - Entry #879 Dave Koch - Entry #877 Peter Wingfield - Entry #874 Here's what Javier has to say: Hello First of all I wa ...
For over a decade, photographers from around the world have participated in PFRE’s monthly photography contests, culminating in the year-end crowning of PFRE’s Photographer of the Year. With a new theme each month and commentary offered by some of the finest real estate & interior photographers anywhere, these contests offer a fun, competitive environment with rich learning opportunities.
PFRE prides itself on the depth and breadth of the information and professional development resources it makes available to our community. Our goal is to help real estate and interior photographers be successful while bringing the community together and elevating the industry as a whole.
As an Amazon Associate we earn from qualifying purchases.
Sometimes, the background in an image distracts my attention from the subject. Blurring your background slightly so that it isn’t as sharp as the subject can make your subject pop. I will explain how to blur background in Lightroom through simple steps.
When it comes to blurring the background in an image, there are 3 easy ways you can do so in Lightroom Classic CC. The following tools can be used to add the blurring effect:
Once you’ve decided exactly what needs to be blurred, select the appropriate tool to achieve a blurred background.
Pick the Right Lightroom Tool
Ultimately, the choice of tool depends upon the image you are using and how much blurring you need to do on the photo.
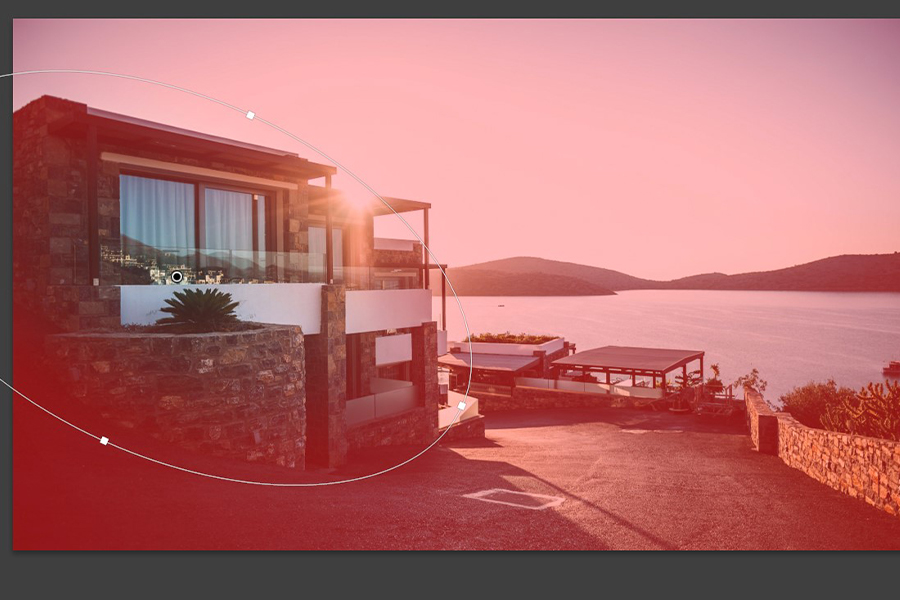
Some images require highly precise blurring effects in specific parts of the image. For such images, you should use the adjustment brush. For images with a focus in the middle that can be contained in an elliptical shape, using the radial filter will be appropriate. It is a quick fix that doesn’t require a lot of preciseness.
As for the images that require blurring across an even medium, you should use the graduated filter. It is a Lightroom tool specially used to adjust landscape photographs or real estate photos that are focused more on the overall landscape (such as backyards).
Blurring the Background Using the Adjustment Brush
The Adjustment Brush tool lets you create a mask over a selected area with the help of a brush and eraser. Any effects you set will be applied to the masked area only and not to the whole picture.
Adjustment Brush Options for Higher Precision in Blurring
Before adding softness to the background, make sure you know the importance of these Adjustment Brush options for precise blurring.
Size: A smaller size brush means your work will take more time, but your strokes will be highly precise. Depending upon the complexity of the area you are going to paint, you can set your adjustment brush’s size.
Feather: The feather size determines the difference in the inner and outer circles of the brush. Setting it will give you more control over the strokes. Remember that the inner ring gives the actual effects, where the outer circle gives milder effects.
Flow: The flow slider allows you to set how much of the effect will be applied to the masked area. Setting it to the highest is the usual practice for the blur effect that I am going to apply.
Auto Mask: An automatic masking feature that selects parts in your image for targeted effects.
Density: The density slider changes the strength of your brush.
You can see the adjustment brush options in the image above. Let’s explain how I used the brush and eraser to blur the background in this image.
By clicking on the Develop module, you will see the Adjustment Brush option under the Histogram (you can also press K on your keyboard to get to the Adjustment Brush).
Since I want to blur part of the image, reduce the Clarity and Sharpness sliders. If you’re not sure how much blur you want to add to your image, start with -30 to see the amount of blur that’s applied. You can always increase or decrease the blurriness after you’ve applied it to your photo.
Click on the small arrow beside Erase to open the options for your masking effect.
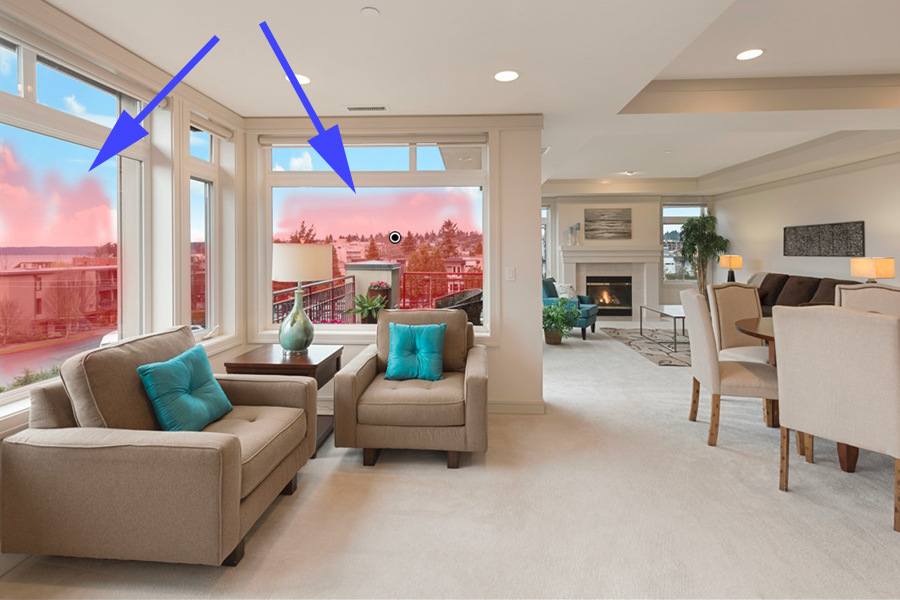
For the image I'm editing, I needed blurring effects on specific areas outside the window. This required precision, so I selected a small brush size, minimal feathering, and a maximum flow. Adjust your brush until you get these settings to where you want them, depending on your image.
Next, begin applying the mask to the selected areas. You can zoom in on the image to make sure you don’t apply effects on unwanted areas.
Turn on the mask overlay by pressing O. This will make the selection you’re painting red.
If you select something that doesn’t require blurring (like the lampshade or part of the balcony in my image), select the Eraser option and remove the mask from that area.
Turn off the overlay by pressing O again so that you will be able to see the effects applied.
From here, you can adjust your sliders to change the intensity of the blur until you get the image looking how you want it to.
The image above shows how the areas that were looking sharp before have now turned blurry, letting the viewer focus on the interior. Below, you can see how the final image looks compared to the original.
Blurring the Background Using the Graduated Filter
For most of your photos taken outdoors, you can blur the background using Graduated Filter in the Lightroom Classic CC. It is a tool that helps you apply a denser effect near the sky and affects the lower area very little.
Here is how to use the Graduated Filter for blurring.
Import the image to your Library.
Go to the Develop module and select the Graduated Filter tool
Similar to the sliders I adjusted when using the Adjustment Brush, reduce the Clarity and Sharpness by sliding the sliders to the left. For this photo, I'm going to reduce the clarity to -75 and sharpness to -75.
Press O to turn on the masking overlay.
Drag the filter over the part of the image you want to blur. You’ll see it turn red.
Once you’ve positioned your filter, you can adjust the two outside lines to increase and decrease how defined the filter is on the edges. The closer the two lines are, the harder of an edge you’ll have. To make the blur look more natural for this image, I've spaced the two lines far apart for a softer edge.
Select the Brush option shown on the top right (beside Edit).
Choose the Erase option and begin erasing the mask from the area where you don’t want to apply effects. (Zoom in for an accurate application)
Turn off the overlay, and adjust the Clarity and Sharpness sliders as needed until you get the desired result.
In my final image (pictured on the right), you can see that the trees in the background were slightly blurred out to place more of a focus on the house. Additionally, because of the time of day this was shot at, the blur adds to the rays of light coming through the trees.
Adjust the sliders such as Clarity and Sharpness. I decided to start with Clarity at -70 and Sharpness at -60 to see how that would affect the image.
Adjust the Feather slider to change how hard or soft your edges of the radial filter will be. Generally for a blur, you’ll want to choose a feather between 70-100.
Uncheck the Invert box so that your blur will be on the outer edges of your radial tool.
Drag the radial tool over the area that you want to keep in focus.
You can adjust the shape and size of the filter by clicking on the edges of the tool and dragging them.
Use the Brush Tool to either add to your selection or erase certain parts of the filter if it was placed on areas of your image that you don’t want blurred.
Conclusion
In Lightroom Classic, background blurring is pretty easy and there are a few ways you can achieve it. Using any of the methods mentioned above, you can make the backdrop less of a focal point, keeping your focus area sharp and clearly visible.
Learn 50+ free tips to apply during your next shoot!
Thank you!
Check your inbox shortly to access the 53 tips to help with your real estate photos.
This site uses cookies. By continuing to browse you are agreeing to our use of cookies both necessary cookies to make our site work and analytic cookies to help us improve our website. Click here to learn more about our privacy policy.