PFRE-Logo-white-bg
Reading
blue-triangle-element

Articles

PFRE is the original online resource for real estate and interior photographers. Since 2006, it has been a community hub where like-minded professionals from around the world gather to share information with a common goal of improving their work and advancing their business. With thousands of articles, covering hundreds of topics, PFRE offers the most robust collection of educational material in our field. The history of real estate photography has been documented within these pages.
All Articles
blue-triangle-element

Latest

Image banner for the November 2023 PFRE Photographer of the Month Winner Javier Sotomayor, with a featured image of his winning photo titled "Open"

Congratulations to Javier Sotomayor, November 2023 PFRE Photographer of the Month! The theme this month was "Open." Javier Sotomayor - Entry #879 Dave Koch - Entry #877 Peter Wingfield - Entry #874 Here's what Javier has to say: Hello First of all I wa ...

Contest
blue-triangle-element

OVERVIEW

For over a decade, photographers from around the world have participated in PFRE’s monthly photography contests, culminating in the year-end crowning of PFRE’s Photographer of the Year. With a new theme each month and commentary offered by some of the finest real estate & interior photographers anywhere, these contests offer a fun, competitive environment with rich learning opportunities. 

Contest Rules
blue-triangle-element

CURRENT CONTESTS

View / Submit
blue-triangle-element

PAST CONTESTS

View Archive
Resources
blue-triangle-element

Resources

PFRE prides itself on the depth and breadth of the information and professional development resources it makes available to our community. Our goal is to help real estate and interior photographers be successful while bringing the community together and elevating the industry as a whole.
blue-triangle-element

Conference News

No items found

How to Scale in Photoshop Without Distorting

Published: 24/07/2023

As an Amazon Associate we earn from qualifying purchases.

Is your image too small for a realtor website banner yet too big for an agent's social media profile photo? Poorly scaled images can lose quality, making them look distorted and unrealistic. 


Being a professional real estate photo editor trained me to scale images properly for various platforms. This is why I'm teaching you hacks on how to scale in Photoshop without distorting.

How to Scale in Photoshop Without Distorting

The best ways to scale images in Photoshop without distortion are to use the Free Transform tool, Image Size Adjustments, Content-Aware Scale, and the Crop tool. For the Free Transform, press CMD/CTRL + T to rescale. To set new dimensions, go to Image, click on Image Size, and input new width and height values.

A picture's size can affect a website's loading time and attract a viewer's attention. Rescaling enables you to optimize your real estate photos and headshots. Choose any of these techniques to scale your edits in Photoshop while avoiding image distortion.

Method 1: Scaling Photos Using the Free Transform Tool

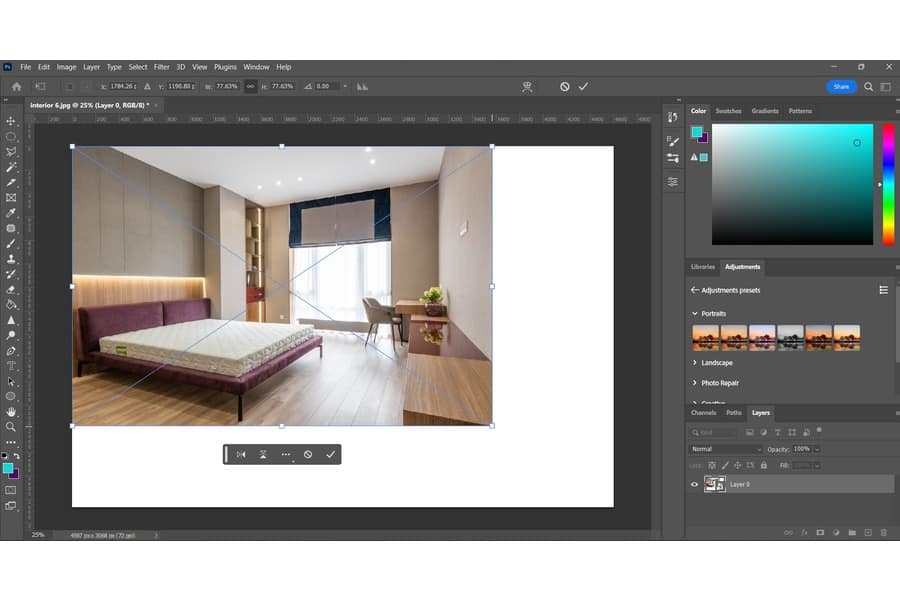
The Free Transform tool is another easy way to rescale pictures in Photoshop while avoiding distortion. It enables you to work on individual layers while rescaling. In this way, you can alter an individual layer's size without affecting the overall image size.

Step 1: Convert to Smart Object

Converting the layer to a Smart Object ensures the image quality remains intact due to its non-destructive editing.

  1. Go to the Layers panel and select the layer you want to edit.
  2. Change the layer to a Smart Object before transforming the size. Head to Layer in the top menu bar, select Smart Objects, then click Convert to Smart Object.
click Layer then select Smart Objects and choose Convert to Smart Object

Step 2: Scale the Image

The Scale function keeps a layer's proportion unchanged even though you resize it. As a result, you won't see any sign of distortion in the height-to-width proportions, even if you alter the pixel dimensions or the vertical and horizontal pixel measurements.

  1. Head to the top bar and click on Edit.
  2. From the drop-down menu, click on Transform, then select Scale. Alternatively, press CTRL + T (Windows) or CMD + T (Mac).
  3. When the Transform tool is active, a blue border will surround the chosen layer's edge.
  4. Hover the cursor over the blue border. Wait for an arrow icon to appear.
  5. Click on the arrow to change the layer's size. Hold and drag to move the layer's edge until you see your preferred dimensions. The layer's size will increase or reduce as you adjust the border in or out.
  6. Release the cursor to finish resizing the picture.
resizing the image

Method 2: Scaling Photos Using the Content-Aware Scale

Are you struggling to fill a frame without maximizing a real estate image's pixels? Using the Content-Aware Scale command is another excellent way to rescale images in Photoshop without distorting or stretching them.

Step 1: Transform and Scale

The Free Transform tool may make subjects look irregular, especially when editing headshots. In comparison, the Content-Aware Scale command enables you to scale up a photo while maintaining the original size of a particular subject.

  1. Unlock the layer.
  2. Navigate to Edit and select Content-Aware Scale.
  3. Use the transform handles to scale the picture.
  4. Press Esc once satisfied with the transformation.
click Edit, then select Content-Aware Scale

Step 2: Protect Important Portions

Suppose the selection is still removing important parts. You can make further adjustments in this part using Adobe's artificial intelligence function called Adobe Sensei.

click Select, then choose Save Selection
  1. Select and unlock the layer.
  2. Navigate to the Properties panel.
  3. Go to Quick Actions.
  4. Click the Select Subject button. Adobe Sensei will automatically detect the subject and make a selection around it.
  5. Head to Select and click on Save Selection.
  6. Input the name for the selection on the Save Selection window, then press OK. For this example, I'm using "interior bed".
  7. Press CTRL + D (Windows) or CMD + D to deselect the selection.
  8. Go back to Edit, then choose Content-Aware Scale.
  9. On the Options bar, set the Protect to "interior bed".
add the name for the image

When you scale the photo, you should see how the bed maintains its appearance without distortion.

Method 3: Scaling Photos Using the Image Size Adjustments

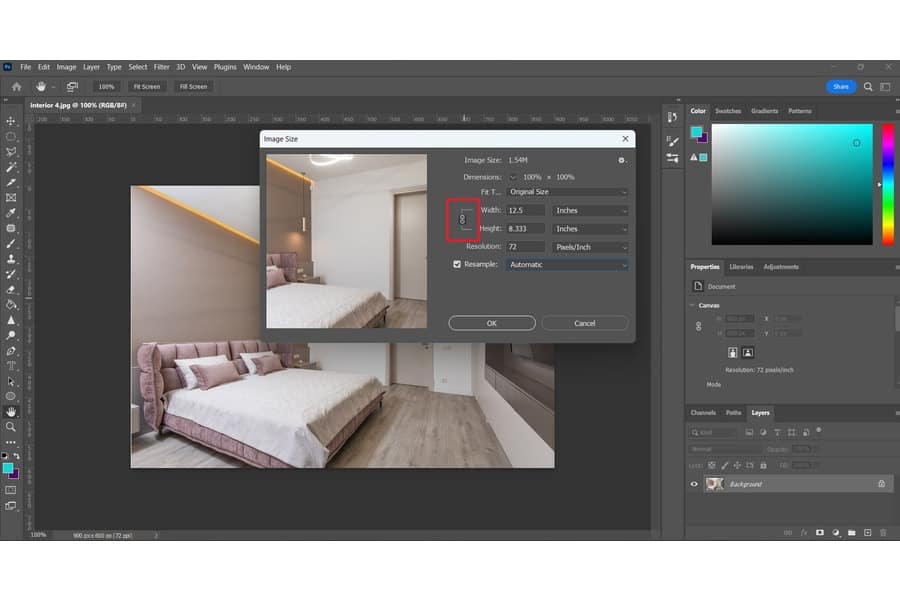
Using the Image Size function is one of the fastest methods to resize real estate photos. It is a great option for enlarging photos at a precise size without worrying about distortion. 

Step 1: Open the Image Size Dialog Box

After opening the photo, the first step is to launch the Image Size dialog box.

  1. Navigate to the top menu bar, click on Image, and choose Image Size in the drop-down. You can also press Alt + CTRL + I (Windows) or Opt + CMD + I (Mac).
  2. In the Image Size dialog box, you will see options for the file size, pixel dimensions, and image resolution. Change the measurement in the Dimension box.
click Image, then choose Image Size

Step 2: Change the Dimension Settings

Now, it's time to set the new width and height, along with the pixel dimensions.

  1. Click on the arrow beside Dimensions. You can change the Dimension Setting to inches or centimeters from the drop-down menu.
  2. Type the new dimensions into the Width and Height value boxes.
  3. Tick the Constrain Proportions checkbox. This will scale the photo without altering the aspect ratio. In effect, the new size won't look stretched or distorted.
  4. If distortion isn't a concern, you can uncheck the Constrain Proportions checkbox or unclick the chain icon.
  5. Click OK to let Photoshop rescale the image without distortion.
add the Width and Height in each boxes

Method 4: Scaling Photos Using the Crop Tool

Another way to scale pictures in Photoshop without distorting is to crop, removing content from one or more sides.

Step 1: Launch the Crop Tool

First, press the C key to open the Crop tool. Go to the drop-down menu next to the Tool Options panel. Click on W x H x Resolution instead of Original Ratio.

select W x H x Resolution

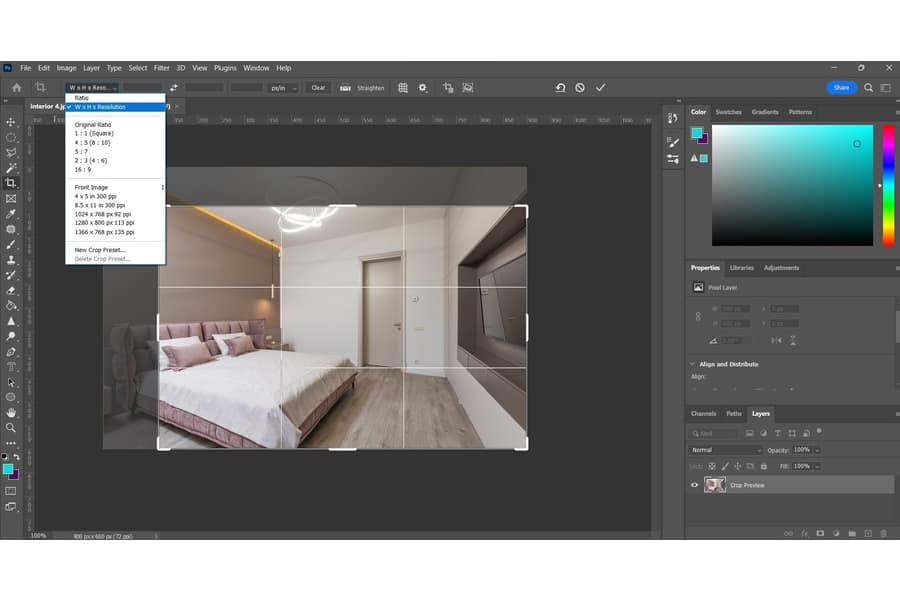
By default, Photoshop typically crops a picture in the same aspect ratio as the original one. This command allows you to adjust the crop setting.

Step 2: Adjust the Crop Dimensions

This is where you can make accurate adjustments by cropping.

  1. Click the photo and drag the tool over the portion of the picture you intend to keep.
  2. Release the cursor. Continue dragging with the mouse if you need to adjust further from one side or another.
  3. If you're already satisfied with the new dimensions, double-click the cropped section or click the green Commit button.
  4. Press the Esc key or click the red Cancel button to cancel the crop selection.
drag the mouse to adjust cropping the image

Related Questions

Why Can't I Rescale an Image in Photoshop?

If you can't rescale pictures in Photoshop, it's likely because the photo is set to Resample or the image layer is locked. To fix this, check the Resample checkbox in the Image Size dialog box. Meanwhile, go to the Layer panel and click on the lock icon beside the layer thumbnail to unlock the layer.

How to Scale Proportionally in Photoshop?

Hold down Shift + Alt (Windows) or Shift + Option (Mac) as you click and drag the transform handles to scale proportionally in Photoshop. If you don't press Shift, you may end up stretching one or more sides of an image.

Why Is There Distortion When Scaling Photos in Photoshop?

Photos get distorted during rescaling because the aspect ratio doesn't proportionally align with the new image dimensions. Scaling means the pixels get stretched instead of being increased in value. Thus, the distortion comes from not keeping the same ratio or proportions.

Conclusion

Use the Free Transform tool, Image Size Adjustments, Content-Aware Scale, and the Crop tool to scale pictures in Photoshop while avoiding distortion. Particular ways may better work depending on the aspect ratio or pixel dimensions you want to retain. Regardless, these features will help you resize photos while maintaining the highest image quality.

Vendors

Rela Logo
CS6 PSE Logo
HD Photo Hub Logo
FullFrame Logo

Learning Topics

.
magnifiercrossmenucross-circle