PFRE-Logo-white-bg
Reading
blue-triangle-element

Articles

PFRE is the original online resource for real estate and interior photographers. Since 2006, it has been a community hub where like-minded professionals from around the world gather to share information with a common goal of improving their work and advancing their business. With thousands of articles, covering hundreds of topics, PFRE offers the most robust collection of educational material in our field. The history of real estate photography has been documented within these pages.
All Articles
blue-triangle-element

Latest

Image banner for the November 2023 PFRE Photographer of the Month Winner Javier Sotomayor, with a featured image of his winning photo titled "Open"

Congratulations to Javier Sotomayor, November 2023 PFRE Photographer of the Month! The theme this month was "Open." Javier Sotomayor - Entry #879 Dave Koch - Entry #877 Peter Wingfield - Entry #874 Here's what Javier has to say: Hello First of all I wa ...

Contest
blue-triangle-element

OVERVIEW

For over a decade, photographers from around the world have participated in PFRE’s monthly photography contests, culminating in the year-end crowning of PFRE’s Photographer of the Year. With a new theme each month and commentary offered by some of the finest real estate & interior photographers anywhere, these contests offer a fun, competitive environment with rich learning opportunities. 

Contest Rules
blue-triangle-element

CURRENT CONTESTS

View / Submit
blue-triangle-element

PAST CONTESTS

View Archive
Resources
blue-triangle-element

Resources

PFRE prides itself on the depth and breadth of the information and professional development resources it makes available to our community. Our goal is to help real estate and interior photographers be successful while bringing the community together and elevating the industry as a whole.
blue-triangle-element

Conference News

No items found

How to Import Photos Into Lightroom

Published: 20/04/2021

As an Amazon Associate we earn from qualifying purchases.

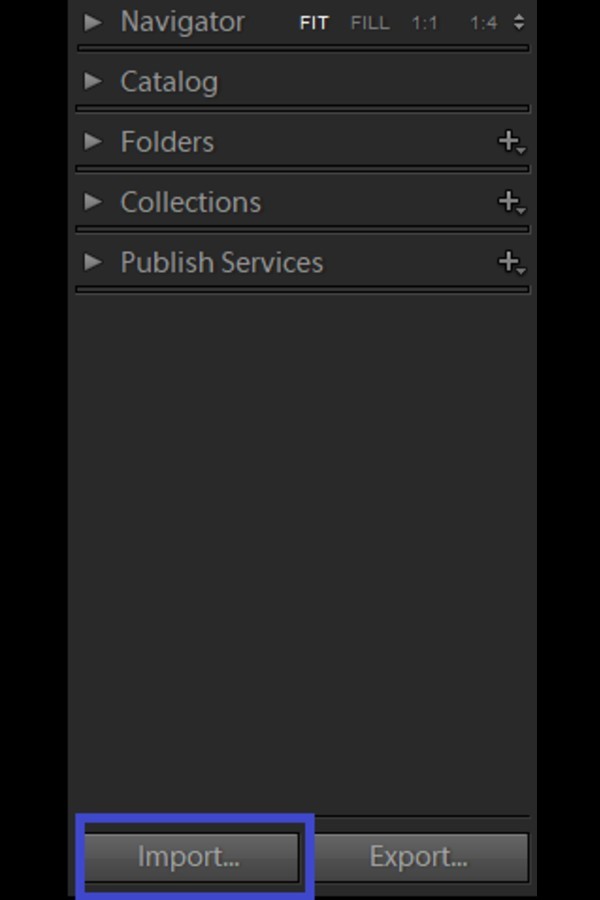
If you want to organize or edit your photos in Lightroom Classic CC, you first need to import them. The process to import photos, although easy, is highly comprehensive, where you get multiple options to handle your images efficiently. Let me walk through how to import photos into Lightroom so that you can organize and process them easily.

How to Import Photos into Lightroom Using the Import Dialog Options

Organizing your photos is one of the pillars of Lightroom. In order to take optimum benefit of it, I highly recommend you to understand the Import dialog features properly. There are options available to view, sort, and store your images while importing them into Lightroom. 

Besides the organization, you get options to edit your images while importing automatically, which is a highly useful feature that saves a lot of time. For those who are new to Lightroom or haven’t used the options included in the Import dialog ever, the in-depth guide below will prove how Lightroom is a robust tool that streamlines your workflow.

When you are in Lightroom’s Library module, the Import Dialog on Lightroom can be launched by clicking on the Import button on the bottom left. Another way to open the Import dialog, you can go to the File menu and click on Import Photos and Videos

Import photos into Lightroom using the Import Dialog options

Select a Source from the Left Panel

In the Import window, the panel on the left-hand side shows the list of sources from where you can import your images. Here, you will see the folders from your internal drive, external drive, or cameras and memory cards that are connected to your computer.

Selecting a source when importing images into Lightroom
  1. Click on the desired folder from the Sources panel, and all the images within it will start appearing on the center window in the form of thumbnails. 
  2. Once the images from the source folder show up in the window, select those which you intend to import. Lightroom will grey out any photos that are already imported. 

Select How to Import from the Center Window

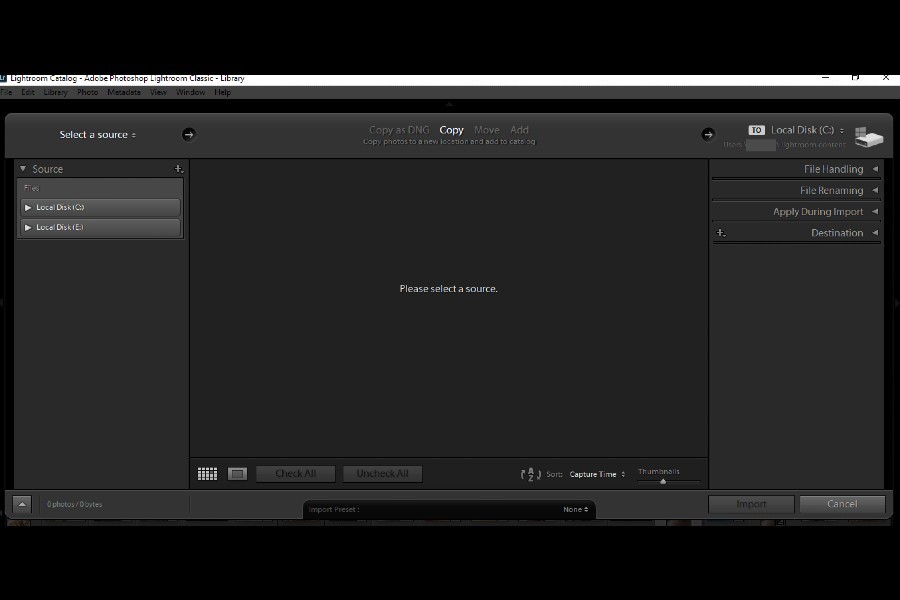
The central section of the Import dialog has three different parts. The bottom bar where the filmstrip views the images, check/uncheck, and photo viewing options are available.

  1. On the bottom of the center window, you will see the option to Check all or Uncheck all images. These speed up the import process if you want to import all or some of the photos from the folder. 
  2. You can also set the thumbnail size with the slider present on the bottom right of the center window. 

Image Viewing Options in Import

Lightroom Classic gives you two options to view your photo. The viewing option buttons are just beside the check/uncheck all buttons. 

  1. The first one is the Loupe view, where you can see an enlarged preview of one image. The keyboard shortcut for Loupe view is E.
  2. The second one is the Grid view option, where the thumbnails of all the images lie in the Grid view. The keyboard shortcut for Grid View is G.

Importing Methods from the Top Bar

Above the main window, there is a section where you will see four options that determine what you want to do with the photos.

  • Copy as DNG: When you are importing images from a camera, choosing Copy as DNG will automatically convert them in the DNG format. DNG or Digital Negative is Adobe’s standard format for RAW images. It might be helpful for you to convert your RAW images into the DNG format directly on import as it is smaller in size, universally compatible, and efficient at detecting file corruption. 
  • Copy: The Copy option allows you to copy images from a memory card to the hard drive on your computer. This is a great option if you want to remove the photos from your memory card to free up space. Via the Copy option, Lightroom does this automatically for you without much hassle. 
  • Move: The Move photo option will remove the photos from the source and save them onto the destination folder that you choose from the right panel. This option comes in handy if you are moving images from one folder to another on your external hard drive
  • Add: The option to add photos can be selected when you want to keep them both on the source folder and on your Lightroom Classic catalog. Keep in mind that this option is not available if you import images from a USB drive or a memory card.

Select Importing Options from the Right Panel

The panel on the right offers complete functionality in image handling while you import them. Not only these features are one of the best ways to organize photos, but they also provide options for setting up auto edits on import. The following options are available on the right panel.   

File Handling

On the top of the right section is the File Handling panel. There are five options here which assist you in handling your image previews and other functions.

  • Build Previews: Lightroom’s default preview option is standard, but you can choose minimal previews (fast loading), Embedded and Sidecar preview (large-sized), and 1:1 previews (much slower loading previews). 
  • Build Smart Previews: You do not need to tick the 'build smart previews box if your original photos are always in the Lightroom catalog. However, if the master or original images are unplugged, you will need smart previews to edit the images. Remember that smart previews take up extra space on your hard drive, so choose accordingly.
  • Don’t Import Suspected Duplicates: This option keeps your catalog free of mess. Therefore you should tick it to refrain Lightroom from importing duplicate images. If there is an image that is already in the catalog, Lightroom will show it as grey in the grid. 
  • Make a Second Copy To: The option to make a second copy provides a safe backup for your photos in case of any issue with the hard drive or if you delete a photo by mistake. Checking this box will help you specify another folder in your hard drive where all the imported images will be automatically sent. You can also use a good quality external drive to store the photos. 
  • Add to Collections: If you want to add the photos to an existing collection in Lightroom, you can do it from here. 

File Renaming

The option to rename your photos is a great way to keep everything recognizable and organized. In this panel, you get an opportunity to choose a template to rename your file, including specifications such as date, image format, and custom text.

You can go ahead and make your own template by choosing the Edit option.

File renaming when importing photos into Lightroom

Apply During Import

Next up is the Apply During Import panel. It gives you options to apply presets, metadata, and keywords to your image.

In the develop settings box, you can choose any preset that you would like to use on these particular images. You can select a preset that you have created yourself or downloaded from another source. This is a useful feature to save time as the edits are auto-applied to the images right on import.

The metadata allows you to add your copyright to the image file to keep them safe from being misused or plagiarized. While adding the keywords tremendously helps to organize your images. You can easily find the images in Lightroom with the help of these keywords.

Destination

In the Destination panel, you can choose where to store the copied or moved images that you intend to import. You can select a folder from the drop-down or create a new one by clicking on the plus icon besides Destination.

You can choose to tick the "into subfolder" option if you wish to organize your images in a subfolder. 

Choose where to store the copied or moved images that you intend to import in Destination panel

Once you are done selecting the desired options in all three sections of the import dialog, you can go ahead and click on Import

Clicking Import option in Lightroom after selecting desired options

Conclusion

Importing images into Lightroom is the initial step to get started with organizing and editing them. The import process is done via the Import Dialog, which is explained in detail in this article. Lightroom’s importing options are diverse, which helps you organize and store your images very efficiently. 

Vendors

Rela Logo
CS6 PSE Logo
HD Photo Hub Logo
FullFrame Logo

Learning Topics

.
magnifiercrossmenucross-circle