PFRE is the original online resource for real estate and interior photographers. Since 2006, it has been a community hub where like-minded professionals from around the world gather to share information with a common goal of improving their work and advancing their business. With thousands of articles, covering hundreds of topics, PFRE offers the most robust collection of educational material in our field. The history of real estate photography has been documented within these pages.
Congratulations to Javier Sotomayor, November 2023 PFRE Photographer of the Month! The theme this month was "Open." Javier Sotomayor - Entry #879 Dave Koch - Entry #877 Peter Wingfield - Entry #874 Here's what Javier has to say: Hello First of all I wa ...
For over a decade, photographers from around the world have participated in PFRE’s monthly photography contests, culminating in the year-end crowning of PFRE’s Photographer of the Year. With a new theme each month and commentary offered by some of the finest real estate & interior photographers anywhere, these contests offer a fun, competitive environment with rich learning opportunities.
PFRE prides itself on the depth and breadth of the information and professional development resources it makes available to our community. Our goal is to help real estate and interior photographers be successful while bringing the community together and elevating the industry as a whole.
As an Amazon Associate we earn from qualifying purchases.
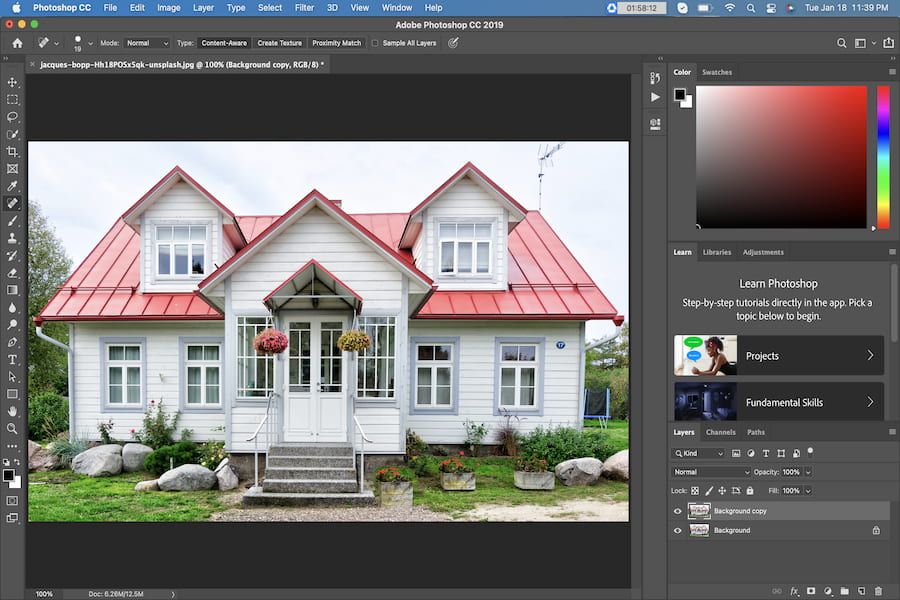
There are times when you take a shot, and you don't notice pesky marks right away. Fortunately, you don't have to return to the location or recreate the setup. You can retouch real estate photos and make them spotless when you know how to use the Patch Tool in Photoshop.
The Patch Tool can retouch and enhance images in Photoshop. You can use it to clone elements, repair bigger sections of a photo, or remove unwanted parts. Using the tool, you can create a selection and blend the surroundings for a seamless edit.
The Patch Tool can be one of your most reliable weapons when editing real estate photos, especially when dealing with intricate details. With that said, these are the different ways the Patch Tool can help improve your post-processing workflow.
Open the Image
Before using the Patch Tool, you first have to open the RAW file. It's better to edit RAW images in Photoshop to ensure you can control tweaking the settings of all the information captured by the camera.
Go to File > Open. Alternatively, press Ctrl + O for Windows or Command + O for Mac.
Navigate to the folder that stores the picture, select the file you want to open, then click OK to launch the image in Photoshop.
Clone or Duplicate an Element
Cloning or replicating an element in a photo is one of the best ways to use the Patch Tool. This feature allows you to copy a portion of a picture from one section to another.
The Patch Tool can blend the patch in without producing sharp lines onto the original image. Real estate photographers and editors can benefit from this, especially when filling an empty space, creating a background, or adding a border to balance out a shot.
After launching the file, right-click on the Layer, then select Duplicate.
You can find the Patch Tool in the Tools Palette on the interface's left side.
Select the Patch Tool and enable the Content-Aware option.
Draw the shape where you want to copy the element. For example, you want to duplicate a plant box and add another one to the patio.
Click in the middle of the empty shape, then drag it to the object (or the plant box example) you want to copy.
You can turn the plant box around to change its position or direction. In this way, you achieve a more natural look and prevent the replica from looking like a repeated fake pattern.
To do so, clear the marching ants by pressing Ctrl + D or Command + D. After that, click Ctrl + T or Command + T to open the Transform tool to move around the object and modify the size.
There may be times when the original area around the shape won't blend with the surroundings right away. For instance, the shadows or black tones of the original plant box appear too dense. In such cases, you can use the Spot Healing Tool or Healing Brush to tidy up the patched area.
Create a selection around the object, then click on Destination in the Options bar.
With the Patch Tool still selected, place the cursor over the selection and move it slightly before releasing the cursor. You should see the surrounding pixels blending better.
Remove Unwanted Elements
There may be times when objects block the subject at a given angle, distracting viewers from the main focus. For instance, electrical lines may photobomb an otherwise beautiful exterior. The photo would look more prominent if there were a clear skyline.
In visual communication and photography, you need to put intentional focus on the most vital components of a picture to create a center of interest within the composition. This is because the human eye forms an opinion about visual composition within 50 milliseconds.
For this reason, real estate photographers and editors must deliver a clear message by editing the images. With the Patch Tool, you can create a more distinct focal point by removing stray stones, overgrown grass, wayward clouds, distracting graffiti, or a tripod's shadow over the landscape.
Duplicate the background layers if you're using versions of Photoshop before CS6. If you're using Adobe Photoshop CS6 or newer, you can use either a duplicated layer or an empty layer. Using a duplicate layer preserves the original image.
Click and hold the Healing Brush to select the PatchTool.
Select the Content-Aware option to synthesize adjacent content for flawless blending.
In the Structure option, enter a value between 1 to 7 to determine how closely the patch should reflect the current patterns. For example, choosing 1 would make the patch adhere very loosely to the existing pattern, whereas 7 would follow the patterns closely.
For the Color option, enter anywhere between 0 to 10 to identify the extent of color blending. For instance, 0 disables color blending, while 10 would apply optimum color blending.
Enable the Sample All Layers option from the Layers panel to create the move-in or patch over from another layer using information from all the layers.
There would be a live preview of the original patch selection, indicating which pixels you will clone. As you drag, you will also see the content from the nearby section filling the new area.
Press Ctrl + D or Command + D when satisfied with the removal.
Repair Larger Areas
Professionally photographed houses sell 32% faster than other listings. Such properties also receive a 47% higher asking price per square foot. However, it's not enough that you simply take photos; it also takes equally professional editing to make listing images appealing.
This is why another great way to use the Patch Tool is to repair larger areas of a photo. Like when there's a big scratch on the wooden floors or the agent's skin, the Patch Tool can retouch such elements and make your image spotless.
Furthermore, there may be times when dust gets into the lens when shooting outdoors on a windy day, or perhaps you forget to clean your lens. You can use the Patch Toolto eliminate the bigger sections that may distract viewers from seeing your shot clearly.
In the toolbar, hold down the Spot Healing Brush, then choose the Patch Tool.
The Patch Tool has 2 operating modes: Normal mode and Content-Aware mode. Use the Normal mode if you want to select the ideal section for the repair manually. Opt for the Content-Aware mode when you need Photoshop to identify the best way to blend the repair with the surroundings.
Go to the Options bar, then choose the Destination radio button. Wait for the tiny green dot to appear in the center of the circle. This enables you to patch either the Destination or the Source area.
Drag to form a marquee around the Source you will use as the patch.
Drag the selected Source area over the portion you need to repair. Once you release the mouse button, the Patch Tool will blend in the Source selection to repair the scratched area.
To fine-tune the patch, go to Edit, then choose Fade Patch Selection. You can change the opacity until there's no sign of the patch.
Conclusion
The Patch Tool is a powerful feature in Photoshop as you can use it to retouch significant parts of an image, duplicate elements, or remove unwanted objects. Take time to practice using the tool, and you can make your real estate photo edits look more crisp and professional.
Learn 50+ free tips to apply during your next shoot!
Thank you!
Check your inbox shortly to access the 53 tips to help with your real estate photos.
This site uses cookies. By continuing to browse you are agreeing to our use of cookies both necessary cookies to make our site work and analytic cookies to help us improve our website. Click here to learn more about our privacy policy.