PFRE is the original online resource for real estate and interior photographers. Since 2006, it has been a community hub where like-minded professionals from around the world gather to share information with a common goal of improving their work and advancing their business. With thousands of articles, covering hundreds of topics, PFRE offers the most robust collection of educational material in our field. The history of real estate photography has been documented within these pages.
Congratulations to Javier Sotomayor, November 2023 PFRE Photographer of the Month! The theme this month was "Open." Javier Sotomayor - Entry #879 Dave Koch - Entry #877 Peter Wingfield - Entry #874 Here's what Javier has to say: Hello First of all I wa ...
For over a decade, photographers from around the world have participated in PFRE’s monthly photography contests, culminating in the year-end crowning of PFRE’s Photographer of the Year. With a new theme each month and commentary offered by some of the finest real estate & interior photographers anywhere, these contests offer a fun, competitive environment with rich learning opportunities.
PFRE prides itself on the depth and breadth of the information and professional development resources it makes available to our community. Our goal is to help real estate and interior photographers be successful while bringing the community together and elevating the industry as a whole.
As an Amazon Associate we earn from qualifying purchases.
Photoshop offers a wide collection of useful image editing tools that help you create useful and impressive effects in any photo. One such tool in Photoshop is the blur tool. Once you learn how to use the blur tool in Photoshop, you will be able to refine your images quickly with a few simple steps.
You may think that the blur tool is used only to create a blur. However, that is not the case. The blur tool in Photoshop can be used for many purposes. It allows you to create a softer look, make one object more prominent than the others, focus or defocus, and many more.
Essentially, the blur tool will help you create some depth of field in any image. In this tutorial, I will show you how easy it is to use the blur tool in Photoshop. Once you go through this guideline and make the blur tool a regular part of your Photoshop workflow, you will find it to be one of the most useful Photoshop tools.
Using the Blur Tool for Blurring
The blur tool is among the most used Photoshop tools. This is because it helps you make your images really pop with a few simple steps. So, let’s learn how to use the blur tool to create the basic blurring effect. Here are the steps to use the blur tool in Photoshop:
Run the Photoshop program and load the image that you want to edit. You can do this by following any of the methods below:
Open the image directly by pressing the ‘Open’ button on the Photoshop homepage.
Go to File > Open, Find your required image and then click on ‘Open.’
Press CTRL + O. Find the image you want to work on, and then click on ‘Open.’
Here is the image that I will be working on:
When you open the image, it will open up in a locked background layer. It is best to create a duplicate of this layer. This is because your original image will remain intact while you apply all the editing operations to the other layer. This way, you can go back to the original in case of any accidental or unwanted changes.
Go to Layer and then to Duplicate Layer. You can right-click on the layer and select the option ‘Duplicate Layer’ from the pop-up menu.
From the toolbar, pick up the Blur Tool, which looks like a water drop.
With the blur tool in your hand, click and move the cursor around to blur the image. Make sure that the cursor only touches those areas in the image that you want to blur.
If you don't like the size and effect of the blur tool, you can change its settings. You can do this through the tool settings bar present right below the menu bar on the top of your Photoshop screen. You can use this bar to modify:
The size of the blur tool
The strength of the blur tool
The mode of the blur tool
This method will help you create a blurring effect. Now let’s discuss using the blur tool to isolate a subject from the rest of the image.
Using the Blur Tool to Make One Object Stand Out
The Blur tool is not only for creating a blurry effect in your images. Instead, you can also use it to isolate, highlight, and focus certain elements in your photos. The Blur tool is a great way to work on the depth of field of any photo. Here are the steps to follow:
Launch the Photoshop program and open the image that you want to work on.
Make sure to create a duplicate layer and let your original image remain intact in the locked background layer.
Select the duplicate layer and pick up the ‘Quick Selection Tool’ from the toolbar that is present on the left of your Photoshop workspace. This tool looks like a paintbrush with a dotted circle drawn around it.
With the quick selection tool in your hand, highlight the area you want to make more prominent than the rest of your image. In case you are unable to grab your element with this tool, you can also use the Lasso tool or Magic Wand tool.
As you complete your selection, go to the top of your window. Here, you will find a couple of buttons. Click on ‘Select and Mask.’ As you click on it, you will see that your Photoshop workspace switches to a new window.
On this new screen, you should see that the area you selected now has an opaque mask surrounding it. This opaque mask is a mode for viewing images so that it is easier to see against its background.
Pick the quick selection tool again from the toolbar and grab any tiny areas or spots that you were unable to highlight earlier.
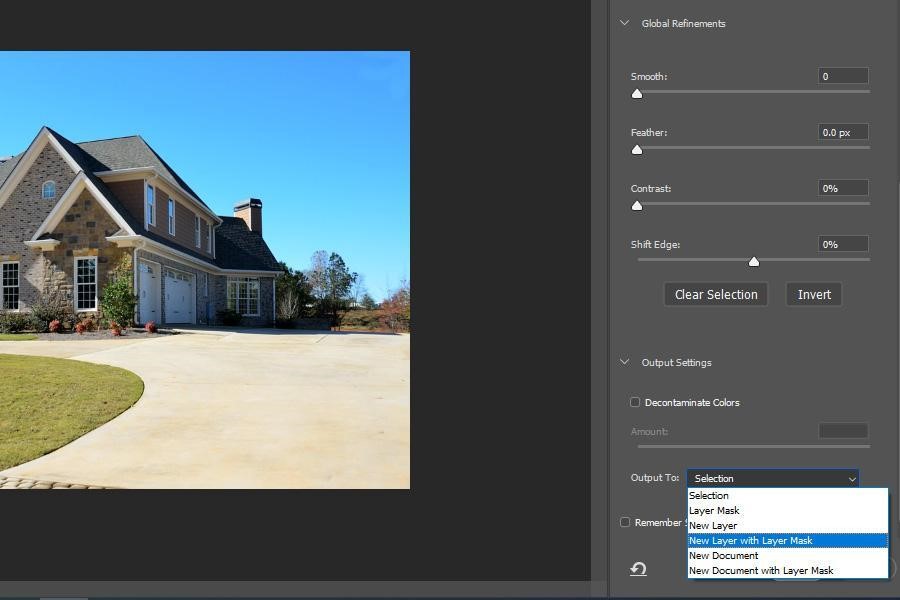
Once you are content with your selection, go to the properties panel on the right side of your screen. Click on the drop-down menu in the ‘Output to’ field. Now, from the drop-down menu, choose ‘New Layer with Layer Mask.’ Press ‘OK.’
At this instant, you will see that your selected element is the only thing you see from the image. Your image will be surrounded by a checkerboard or an empty space, showing transparency.
Now, hide the duplicate layer temporarily by clicking on the eye next to it. Now, select the background layer. With the background layer selected, press down the CTRL key and click on the layer mask simultaneously. This will select both layers.
Now, go to the menu bar present on the top of your Photoshop screen and click on ‘Select.’ This will open a drop-down menu for you.
In this menu, navigate to Modify > Expand.
Now, in the popup window, choose around 10 pixels, and then click ‘OK.’
Unhide the duplicate layer by clicking on the empty box beside it.
Now, press Shift + Del.
You will now see a Fill Window. From here, select Content Aware, and then click ‘OK.’
Press Ctrl + D. You will now see that the area you selected will now no longer be visible.
Hover your cursor to the menu bar at the top of your Photoshop screen and click on Filter. This will open a drop-down menu for you.
From the menu, go to Blur Gallery > Field Blur
Now, you will see a pin with a circle on your image. This pin shows the field blur that I will apply. Move this point to a spot in your selected area where you would like to see a lesser amount of blur. You can either adjust the slider or click on the circle to reduce the amount of blur.
Add another pin, move it to a spot in the background and increase the amount of blur. Once you are done, click on ‘OK.’
Now, you will notice that your selected element becomes more prominent than the rest of your image.
Conclusion
Now you know how to use the blur tool in Photoshop. With the blur tool, you can easily create artistic effects in your images, emphasize more on some parts of the photo, or make some parts lose focus. Whatever purpose you use it for, the blur tool helps you achieve your editing goals easily and quickly.
Learn 50+ free tips to apply during your next shoot!
Thank you!
Check your inbox shortly to access the 53 tips to help with your real estate photos.
This site uses cookies. By continuing to browse you are agreeing to our use of cookies both necessary cookies to make our site work and analytic cookies to help us improve our website. Click here to learn more about our privacy policy.