PFRE-Logo-white-bg
Reading
blue-triangle-element

Articles

PFRE is the original online resource for real estate and interior photographers. Since 2006, it has been a community hub where like-minded professionals from around the world gather to share information with a common goal of improving their work and advancing their business. With thousands of articles, covering hundreds of topics, PFRE offers the most robust collection of educational material in our field. The history of real estate photography has been documented within these pages.
All Articles
blue-triangle-element

Latest

Image banner for the November 2023 PFRE Photographer of the Month Winner Javier Sotomayor, with a featured image of his winning photo titled "Open"

Congratulations to Javier Sotomayor, November 2023 PFRE Photographer of the Month! The theme this month was "Open." Javier Sotomayor - Entry #879 Dave Koch - Entry #877 Peter Wingfield - Entry #874 Here's what Javier has to say: Hello First of all I wa ...

Contest
blue-triangle-element

OVERVIEW

For over a decade, photographers from around the world have participated in PFRE’s monthly photography contests, culminating in the year-end crowning of PFRE’s Photographer of the Year. With a new theme each month and commentary offered by some of the finest real estate & interior photographers anywhere, these contests offer a fun, competitive environment with rich learning opportunities. 

Contest Rules
blue-triangle-element

CURRENT CONTESTS

View / Submit
blue-triangle-element

PAST CONTESTS

View Archive
Resources
blue-triangle-element

Resources

PFRE prides itself on the depth and breadth of the information and professional development resources it makes available to our community. Our goal is to help real estate and interior photographers be successful while bringing the community together and elevating the industry as a whole.
blue-triangle-element

Conference News

No items found

How to Get Rid of the Checkered Background in Photoshop

Published: 20/07/2023

As an Amazon Associate we earn from qualifying purchases.

You might wonder why you are isolating the subject from the background, and Photoshop is filling the area with a checkered grid. Learning how to get rid of checkered backgrounds in Photoshop can help you differentiate between this transparency grid and the background that comes with the image.

How to Get Rid of the Checkered Background in Photoshop

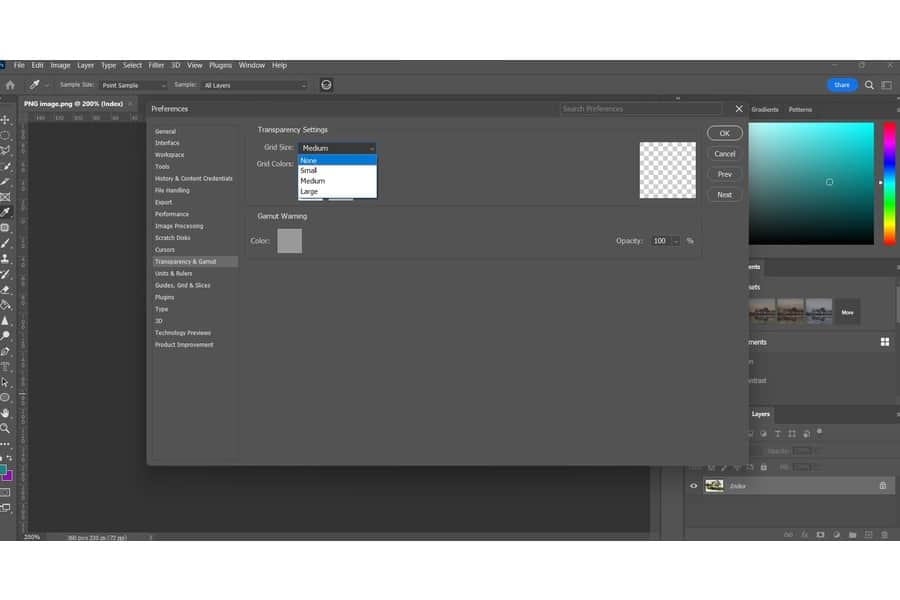
To remove the checkered background in Photoshop, go to Edit/Photoshop, expand Preferences, click Transparency & Gamut, and then change the Grid Size to None. You may also use the Remove Background button, Quick Selection tool, or the Magic Wand for a more targeted edit. 

While checkered backgrounds in an image can be transparent, it's also possible to download an image that has a checkered background that is not transparent. The problem is both backgrounds can look the same in Photoshop. Fortunately, the following steps can help you remove the background depending on whether it represents transparency or not. 

Removing Transparent Checkered Background

The transparent checkered background appears in Photoshop when working on a layer with transparency enabled. It helps you differentiate between opaque and transparent areas. In effect, you can see through the underlying layers or background.

Since this background represents invisible areas and not actual pixels, it's not possible to remove it entirely. However, you can adjust the appearance settings on how Photoshop represents transparency using the following steps. 

Using Photoshop to remove a transparent checkered background for an image of a yellow house with a lawn
  1. If you are using a Windows PC, go to the Edit menu, select Preferences, and then choose Transparency & Gamut.
  2. If you are using a Mac, go to the Photoshop menu, select Preferences, and then choose Transparency & Gamut. 
  3. In the Transparency & Gamut preferences window that opens, click on the drop-down menu next to the Grid Size.
  4. In the options list, choose None and click OK to apply the new settings. Usually, this will remove the checkered grid and replace it with a white background. 
  5. It's advisable to change the layer color since this can make it challenging to know the borders of the photo. This is ideal when removing the background of a white subject, such as a white wall in a real estate interior.
Choosing the transparency settings in Photoshop

Removing a Checkered Background Attached to an Image

Unlike the default transparent background that indicates transparency, an opaque one consists of solid squares without transparency. Most of the time, this is the type of background you will have if you merge the photo and background layers into a single layer before exporting in Photoshop. 

Image of a two story house with a transparent checkered background

You can still get an opaque background if you save the image as JPEG, as JPEG images do not include an alpha channel, which is necessary to define transparency. Since the checkered area is part of the image pixels, you will need to remove it just like any other background. 

The good thing is that the grid pattern of the background might be somewhat unique from the subjects of a real estate photo, such as walls, lawns, or rooms, making it easier for Photoshop to isolate the subject. Depending on the version of Photoshop you are using, you can use the following methods to remove the background. 

Remove Background Button

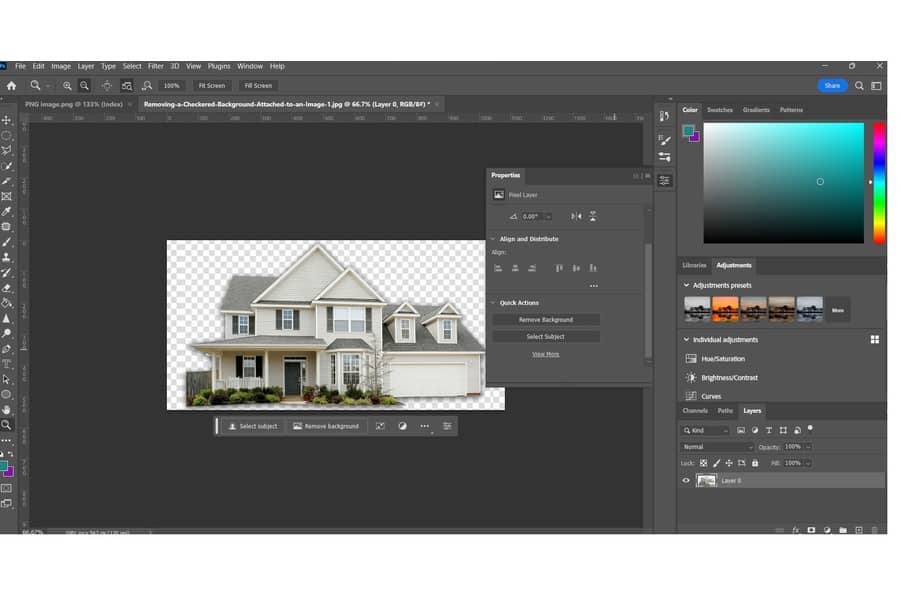
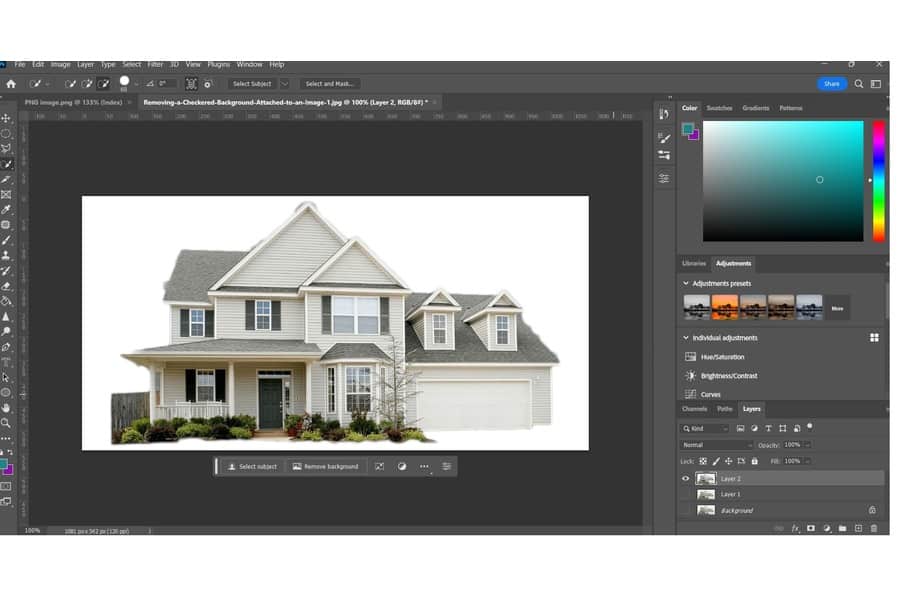
The latest versions of Photoshop come with artificial intelligence tools that can help you quickly remove the background. For instance, the Select Subject option was added in Photoshop CC 2018. Meanwhile, the Remove Background was added in Photoshop CC 2020. 

Choosing the Properties feature when removing the checkered background of a house in Photoshop

The Remove Background command is more accurate than the Select Subject command. You can use it to remove the background using the following steps.

Removing the background button in a checkered background of a real estate photo
  1. Open your choice of image in Photoshop
  2. Unlock the background layer for editing by clicking the padlock icon on the right side of the thumbnail representing your image in the Layers panel.
  3. Navigate to Windows on the top menu and choose Properties
  4. On the window that appears, scroll down to Quick Actions and click the Remove Background button. Usually, Photoshop will use its artificial intelligence to analyze the image and isolate the main subject from the background via the layer mask.
  5. The checkered pattern of the opaque background might look similar to the transparent one. You can know the background has been removed if a layer mask is added next to the initial image layer. 
Using the remove background photo tool in Photoshop to create an opaque background on an image of a house

Quick Selection Tool

Select the Quick Selection tool from the toolbar on the screen's left-hand side. It looks like a brush with a dotted circle around it. Adjust the brush size in the options bar at the top and then click and drag over the areas of the image you want to keep.

Using the Quick Selection tool in Photoshop to remove the checkered background in an image of a house

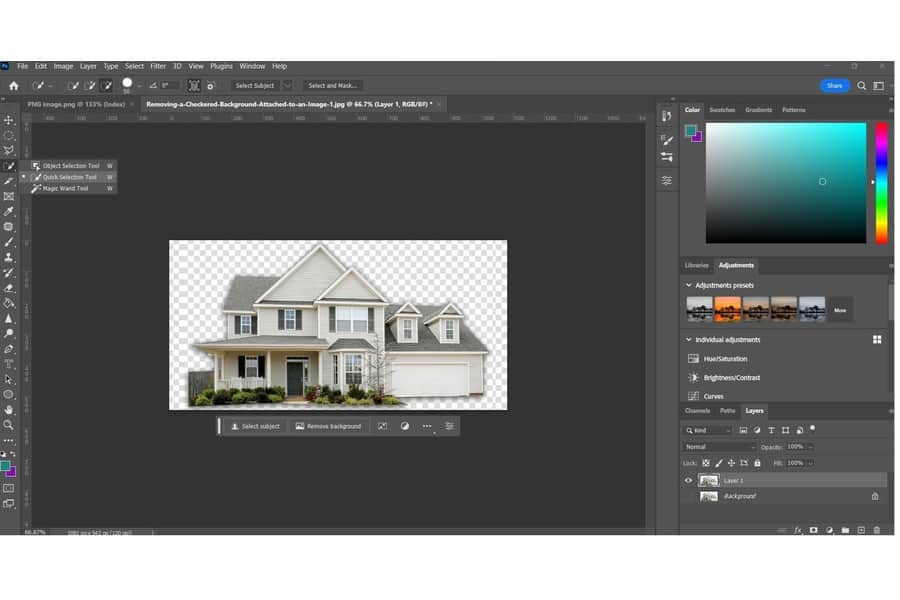
The tool will automatically select similar portions of the image based on the brush size and your initial selection. 

Selecting the area of an image to isolate and remove the checkered background of a house
  1. Once you have made the initial selection, go to the Select menu and choose Refine Edge or Select and Mask in newer Photoshop versions. 
  2. From the Refine Edge dialog box, adjust the settings to achieve a smooth and accurate selection, especially around the edges of the subject. 
  3. Click OK to apply the changes and return to the main Photoshop interface. 
  4. Press Ctrl + J on Windows or Command + J on Mac to create a new layer with just the selected portion. 
Image of a house with a white background after using the Quick Selection tool in Photoshop

Magic Wand

The checkered background in an image can be created intentionally by the image creator or as a result of certain image file formats.

Using the Magic Wand tool in Photoshop to remove the checkered background in an image of a house

The good thing is that the Magic Wand tool allows you to select areas of similar tone with a single click. Since the background is checkered and has distinct colors that can be easily differentiated from the main subject, this tool can work well, just like the Quick Selection tool.

  1. If the initial selection includes areas you want to keep, hold down the Shift key and click on those areas you want to add to the selection. 
  2. To remove parts of the selection, hold down the Alt key on Windows or the Option key on Mac and click on the areas you want to subtract from the selection.
  3. Once you have the background selected, press the Delete key on your keyboard. This will remove the selected background pixels and make them transparent. 

Note that the changes might not be easily visible as the opaque background will be replaced with a similarly checkered grid. 

Image of a house with a white background after using the Magic Wand Tool in Photoshop

Related Questions

How Should I Export a Photo After Removing the Background?

Exporting the photo as PNG is advisable as it supports transparency and can preserve the background as transparent pixels. Go to the File menu, then choose Export. Click on Export As then select PNG as the file format in the export options dialog box.

Can I Replace the Background With a Different Background Image?

Yes, after removing the checkered background and creating transparency, you can easily add a new background image or color. In most cases, you can create a new layer beneath the image layer and fill it with the desired color or place another picture as the background.

Can I Remove the Background Without Deleting Any Part of the Image?

Yes, you can remove the background without deleting any part of the image by creating a layer mask. This allows you to hide or reveal portions of the layer while preserving the original image. You can use Selection tools or Photoshop's Select and Mask feature to refine the mask and blend seamlessly with the image.

Final Thoughts

Knowing how to get rid of the checkered background in Photoshop can help you change the color of the transparency grid to all-white by changing the transparency settings. To remove a background that comes with an image, you can use background removal tools or adjust the Transparency & Gamut settings.

Vendors

Rela Logo
CS6 PSE Logo
HD Photo Hub Logo
FullFrame Logo

Learning Topics

.
magnifiercrossmenucross-circle