PFRE-Logo-white-bg
Reading
blue-triangle-element

Articles

PFRE is the original online resource for real estate and interior photographers. Since 2006, it has been a community hub where like-minded professionals from around the world gather to share information with a common goal of improving their work and advancing their business. With thousands of articles, covering hundreds of topics, PFRE offers the most robust collection of educational material in our field. The history of real estate photography has been documented within these pages.
All Articles
blue-triangle-element

Latest

Image banner for the November 2023 PFRE Photographer of the Month Winner Javier Sotomayor, with a featured image of his winning photo titled "Open"

Congratulations to Javier Sotomayor, November 2023 PFRE Photographer of the Month! The theme this month was "Open." Javier Sotomayor - Entry #879 Dave Koch - Entry #877 Peter Wingfield - Entry #874 Here's what Javier has to say: Hello First of all I wa ...

Contest
blue-triangle-element

OVERVIEW

For over a decade, photographers from around the world have participated in PFRE’s monthly photography contests, culminating in the year-end crowning of PFRE’s Photographer of the Year. With a new theme each month and commentary offered by some of the finest real estate & interior photographers anywhere, these contests offer a fun, competitive environment with rich learning opportunities. 

Contest Rules
blue-triangle-element

CURRENT CONTESTS

View / Submit
blue-triangle-element

PAST CONTESTS

View Archive
Resources
blue-triangle-element

Resources

PFRE prides itself on the depth and breadth of the information and professional development resources it makes available to our community. Our goal is to help real estate and interior photographers be successful while bringing the community together and elevating the industry as a whole.
blue-triangle-element

Conference News

No items found

How to Make Eyes Glow in Photoshop

Published: 20/06/2023

As an Amazon Associate we earn from qualifying purchases.

Was there a time when you looked at agent portraits and felt something was missing in their eyes? With Photoshop, you can brighten and make the eyes pop for a more appealing look. Here is a step-by-step guide on how to make eyes glow in Photoshop.

How to Make Eyes Glow in Photoshop

To make eyes glow in Photoshop, you first need to create a new layer and add a Layer Mask to use the Brush tool to paint the irises and brighten the eyes. Fine-tune the details by lowering the Layer Opacity. You may also change the eye color using the Selective Color adjustment layer and Sharpen tool.

There are times when poor lighting, improper flash output, or incorrect camera settings can dull the eyes in headshots. Fortunately, a few simple steps in Photoshop can help you enhance the eyes and make them glow in real estate agent headshots.

Enhancing the Iris 

There are different ways to give the eyes a certain glow. The first one is to enhance the iris and give more life to it. You can do this using the layer masks and the Brush tool. 

Step 1: Add a Levels Adjustment Layer

The first step to making the eyes glow in Photoshop is to create an adjustment layer.

  1. Go to Layer, then click on Duplicate Layer. Alternatively, press CTRL/CMD + J, click the Adjustment Layer icon, and choose Curves.
  2. When the layer is active, you should see a box with a diagonal line on the screen's right side.
  3. Since you need to brighten the Highlights, click near the diagonal line's right end and pull it upwards. This will lighten the whole picture, although you only need to focus on the brightness of the eyes.
Adding a Levels Adjustment Layer using Photoshop in an image of a person with black hair wearing a white shirt and blue necktie

Step 2: Invert the Mask

From the Properties of the Curves, press Invert to invert the layer mask.

This will place the brightness edits behind the top layer. Don't worry; the photo will revert to normal as the modifications go behind the top layer.

Invert the Mask of an image of a person with black hair wearing a blue and black earring, white shirt, and blue necktie using Photoshop

Step 3: Fill the Layer Mask With Black

Keep in mind that when you use layer masks in Photoshop, some parts of a photo will appear white when affected by the mask. Portions in black mean the mask is turned off.

You will notice that the layer mask's thumbnail is white. Thus, you must change it to black to paint in the layer adjustments. In this way, you can apply targeted adjustments to the eyes only.

  1. Select your Levels layer in the Layer panel.
  2. Head to Edit, then click on Fill.
  3. Choose Black from the Contents drop-down menu.
  4. Click on OK to change the Levels mask to black.
Filling the Layer Mask with black in Photoshop of an image of a person with black hair wearing a blue and black earring, white shirt, and blue necktie

Step 4: Use the Brush Tool to Brighten the Eyes

The eyes have the greatest effect when people judge based on physical features. It's essential that even though you need to make some image enhancements, the eyes still look close to what they are in real life.

For this part, the goal is to keep the glow as natural as possible, not an otherworldly glow that will make the iris or eye color look fake.

  1. Go to the toolbox on the screen's left side and click on the Brush tool. Alternatively, press the B key on the keyboard.
  2. Check if the foreground color is white in the little boxes at the toolbox panel's bottom part.
  3. Choose the appropriate Brush Style. The Soft Round Brush is a good starting point for fixing eye blemishes.
  4. Adjust the Brush Size to about the same size as the width of the iris.
  5. Reduce the Brush Hardness to a softer edge.
  6. Zoom in on the eyes.
  7. Gradually paint the irises to reveal the brightness made from the underlayer. In effect, the irises will have a natural glow.
Using the Brush Tool to brighten the eyes in the image of a person wearing round earrings, a white button shirt, and a blue necktie

Step 5: Fine-Tune the Adjustments

If you made some mistakes with painting or want to control the intensity of the brightness, you can still fine-tune the edits before saving the file.

  1. Re-open the Curves Adjustment box.
  2. Pull up or down the diagonal line to adjust the brightness.
  3.  By default, the layer opacity is set to 100%. Decrease the adjustment layer's Opacity to around 65% if the effect is too bright.
  4. If you accidentally paint in other parts, like the eyelashes, switch the painting color to black and paint out the mistakes.
Fine-Tune the Adjustments in the image of a person with black hair wearing a white button shirt and blue necktie using Photoshop

Step 6: Flatten the Image

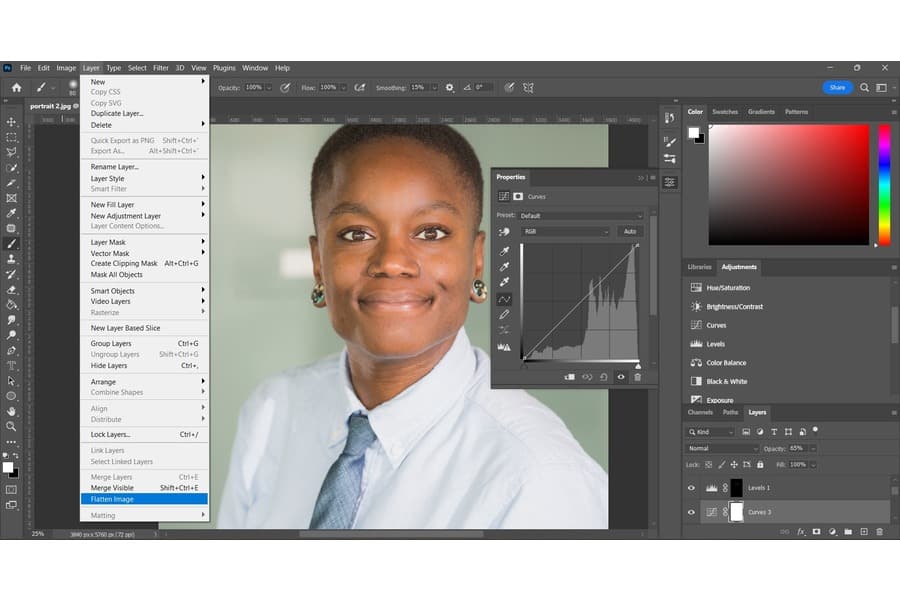
Once satisfied with the fine-tuning, you can now flatten the image to merge the visible layers into the background to discard hidden layers. Likewise, this step lets you reduce the file size.

To do so, go to Layer, then click on Flatten Image. Now, see how the eyes pop compared to the original version.

Editing the image of a person with black hair wearing a white button shirt and blue necktie using Photoshop

Changing or Brightening the Eye Color

The eyes can be one of a person's most defining physical traits. The eye color can leave a lasting impression on some people. This may even influence how potential buyers or clients can perceive real estate agents.

For instance, researchers have found that most people see brown-eyed individuals as more trustworthy and sympathetic. Meanwhile, those with blue eyes appear more competitive than others.

This is why it's common for agents to request real estate photo editors to change their eye colors in portraits, especially if they believe this can make them look more appealing. Add more retouching services to your business by learning to change or brighten eye color to make the eyes pop.

Step 1: Select the Eyes

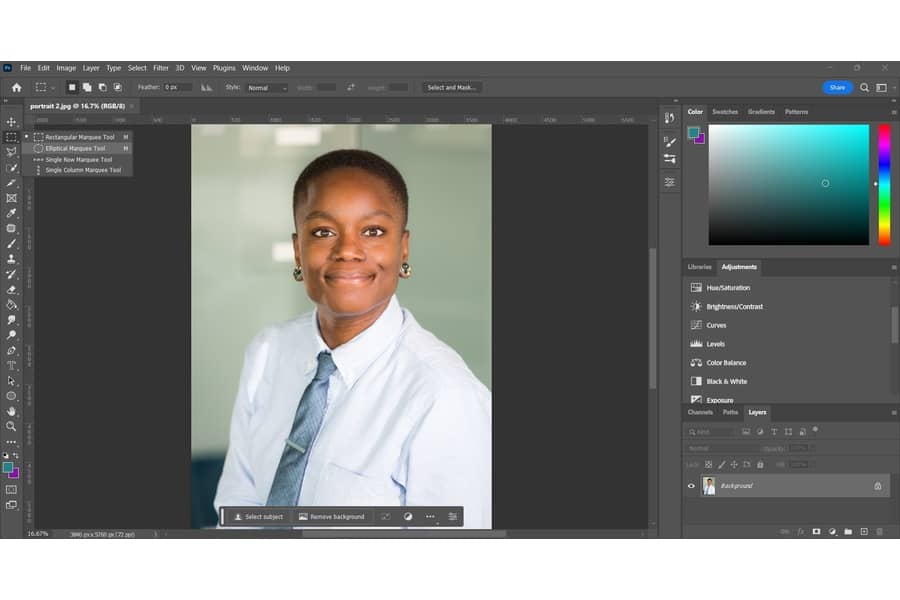
The Elliptical Marquee tool is perfect for making selections with elliptical or circular shapes, like the eyes.

  1. Zoom in on the eyes.
  2. Press Shift + M to open the Elliptical Marquee tool.
  3. Create a circle and put it over one eye. Do the same to the other eye.
Making the eyes in an image of a person wearing a white button shirt, blue necktie, and round earrings glow using Photoshop

Step 2: Brighten the Eyes and Choose a New Eye Color

Adjusting contrast to brighten the image is a crucial step to set the difference between the lightness and darkness of the eyes. You can also choose a new eye color as you adjust the contrast.

  1. To choose a color, go to Properties to open the Selective Color adjustment layer. 
  2. Switch the Neutrals to Blacks.
  3. Adjust the Cyan, Yellow, Magenta, and Black sliders to achieve your desired color change.
  4. Drag the Blacks slider until you achieve the proper contrast. Move it to the right to increase contrast or to the left to decrease contrast.
Brighten the eyes and choose a new eye color using Photoshop

Step 3: Sharpen the Eyes

You can fine-tune the color change by sharpening the eyes.

  1. Press CTRL/CMD + J to open the Sharpen tool.
  2. Adjust the Mode to Darken and Strengthen value to 50.
  3. Circle each eye at least three times to fine-tune the adjustments.
Sharpen the eyes in the image of a woman with black hair wearing round earrings and white shirt using Photoshop

Related Questions

How to Enhance Catchlights in the Eyes?

Form a new layer above the background layer, use the Magic Wand to select the catchlights, and then use the Brush tool to brighten the catchlights. You can only use this to make the eyes glow if there are catchlights that reflect into the camera when you take the image.

How to Remove Eyebags in Photoshop?

To remove eyebags in Photoshop, you first need to dodge and burn them to remove the shadows under the eyes. After that, use the Healing Brush tool to remove the creases. The Brush tool can fix the skin's color and texture.

How to Draw Eyelashes in Photoshop?

To draw eyelashes in Photoshop, you must create a new layer and use the Soft Round Brush to draw each eyelash on the eyelids. After that, use the Smudge tool to straighten the eyelashes.

Conclusion

By using the Adjustment Layer, Layer Mask, Brush Tool, Selective Color adjustment layer, and Sharpen tool, you can make the eyes glow in Photoshop. Now that you know how to brighten the eyes in headshots, you can create truly captivating headshots for your real estate photography clients.

Vendors

Rela Logo
CS6 PSE Logo
HD Photo Hub Logo
FullFrame Logo

Learning Topics

.
magnifiercrossmenucross-circle