PFRE-Logo-white-bg
Reading
blue-triangle-element

Articles

PFRE is the original online resource for real estate and interior photographers. Since 2006, it has been a community hub where like-minded professionals from around the world gather to share information with a common goal of improving their work and advancing their business. With thousands of articles, covering hundreds of topics, PFRE offers the most robust collection of educational material in our field. The history of real estate photography has been documented within these pages.
All Articles
blue-triangle-element

Latest

Image banner for the November 2023 PFRE Photographer of the Month Winner Javier Sotomayor, with a featured image of his winning photo titled "Open"

Congratulations to Javier Sotomayor, November 2023 PFRE Photographer of the Month! The theme this month was "Open." Javier Sotomayor - Entry #879 Dave Koch - Entry #877 Peter Wingfield - Entry #874 Here's what Javier has to say: Hello First of all I wa ...

Contest
blue-triangle-element

OVERVIEW

For over a decade, photographers from around the world have participated in PFRE’s monthly photography contests, culminating in the year-end crowning of PFRE’s Photographer of the Year. With a new theme each month and commentary offered by some of the finest real estate & interior photographers anywhere, these contests offer a fun, competitive environment with rich learning opportunities. 

Contest Rules
blue-triangle-element

CURRENT CONTESTS

View / Submit
blue-triangle-element

PAST CONTESTS

View Archive
Resources
blue-triangle-element

Resources

PFRE prides itself on the depth and breadth of the information and professional development resources it makes available to our community. Our goal is to help real estate and interior photographers be successful while bringing the community together and elevating the industry as a whole.
blue-triangle-element

Conference News

No items found

How to Fill a Shape With Color in Photoshop

Published: 06/06/2023

As an Amazon Associate we earn from qualifying purchases.

Shapes can bring an additional element when you're editing real estate images or posters. However, you need to fill it with the right color to create a cohesive design. We're giving a step-by-step guide on how to fill a shape with color in Photoshop.

How to Fill a Shape With Color in Photoshop

After creating a shape, select the shape layer, press the U key to activate the Shape tool, click on the Fill settings, choose your desired color, and apply it to the shape. Other options include the Paint Bucket tool, Solid Color settings, and Gradient tool.

There are different ways to put color on shapes in Photoshop. This depends on the kind of shape you're working on or the color effect you want.

Option 1: Using the Fill and Stroke Settings

The Fill and Stroke options are the most common tools to fill a shape with colors. These settings let you quickly fill a selection with colors or patterns.

Step 1: Create a New Shape Layer

Before anything else, you'll need a shape to work on.

  1. Press the U key on the keyboard.
  2. Click and hold on the Shape tool icon to show the various custom Shape tools. These include circles, triangles, rectangles, and custom shapes.
  3. Once you have your desired shape, click and drag on the canvas to produce the shape.
Create a New Shape Layer in Photoshop

Step 2: Set the Fill Options

With the shape layer selected, keep the Shape tool active to reveal the color fill settings.

  1. Go to the upper settings bar and click on the Fill setting.
  2. As long as you keep the shape layer selected, you should see the display of active colors.
  3. Click on the Fill option to change the shape's color.
  4. A panel will show up, revealing different preset color swatches. These include samples or recently used colors.
  5. If you don't see your preferred color, click the Color Picker option from the panel's upper right corner.
  6. Select your desired color and press OK to put the color in shape.
  7. Create separate layers if you want to put more than one color in shape.
Set the Fill Options using Photoshop

Step 3: Modify the Stroke Settings

The Stroke settings let you adjust the shape's outline color. For instance, you want to make the outline invisible.

Click on the white box with the red line from the Stroke settings to make the outline transparent. In effect, you should only see the shape's fill color.

Modify the Stroke Settings in Photoshop

Option 2: Using the Paint Bucket Tool

There may be instances where you only want to color a part of a shape. The Paint Bucket tool is a good option for filling solid shapes with your chosen color or pattern.

This depends on what you choose from the foreground color swatch or whichever is similar in color value to the pixels you click. When you click on any drawing or painting tool in Photoshop, the color you will apply to the canvas automatically becomes the foreground or active color.

  1. Select a foreground color.
  2. Click on the Paint Bucket tool under the Gradient tool in the toolbar.
  3. Adjust the settings in the Tool Options bar. For instance, set a low Tolerance level to fill pixels with color values almost similar to the pixel you click. Meanwhile, a higher Tolerance will result in a wider range of colors.
  4. You can also lower the Opacity to let paint strokes show through. Finally, adjust the Mode settings to control how the paint color blends with the photo's existing pixels. 
  5. Click the shape you want to fill.
Using the Paint Bucket Tool in Photoshop

Option 3: Using the Color Fill Layer

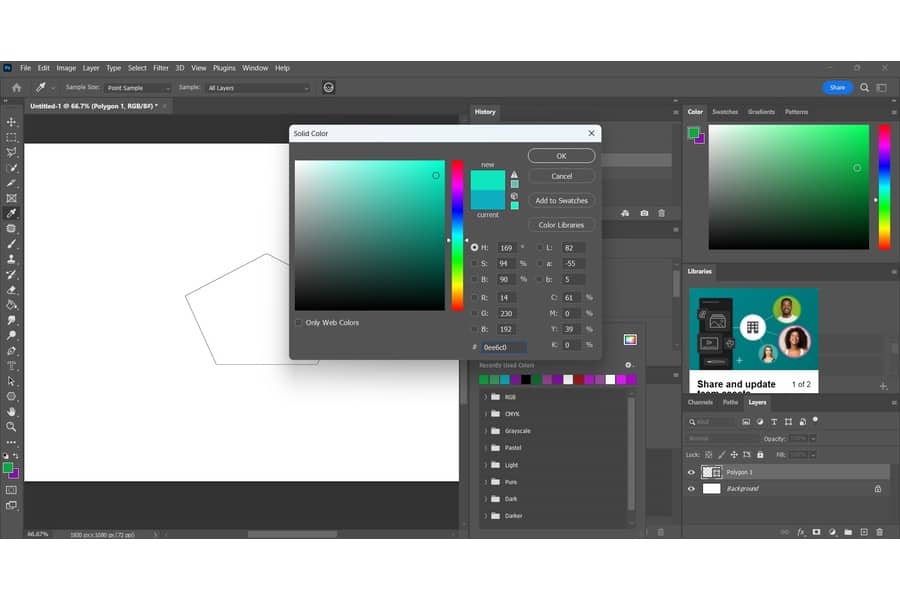
The previous methods won't work if you have rasterized shapes. Fortunately, a color fill layer can solve this dilemma. 

When editing in Photoshop, graphics can either be raster or vector. A rasterized shape consists of numerous tiny squares called pixels. Zooming in, you will see solid edges breaking into jagged squares.

You may need to add filters or effects for complex real estate photo manipulation. However, vector layers may not respond to them. Thus, you'll need to rasterize the layer to work on the individual pixels.

Step 1: Set the Fill Layer Options

The fill layer in Photoshop allows you to work on solid colors, patterns, and gradients.

  1. Head to Layer, expand the New Fill Layer options and click on Solid Color.
  2. You may rename the layer before selecting your desired color.
  3. With your chosen color, make sure to put the color fill layer above the shape layer in the Layer Panel.
  4. Right-click on the color fill layer.
Set the Fill Layer Options in Photoshop

Step 2: Fill the Shape With Color

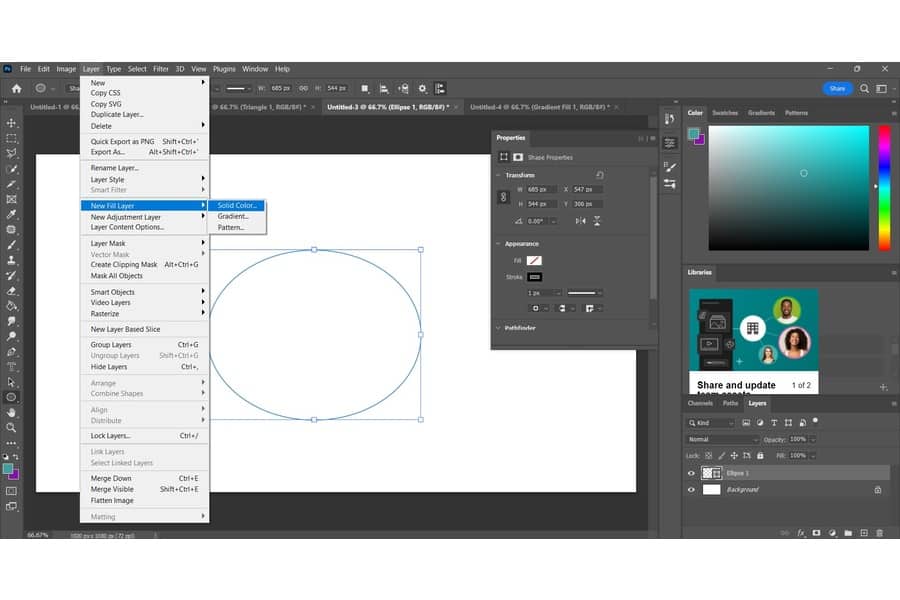
Select the Create Clipping Mask option. This should restrict the color fill layer to the shape you clipped to, replacing the original fill color.

You can eventually change the color. To do so, click the color fill layer icon and pick a new color from the Color Picker.

Fill the Shape with Color

Option 4: Using the Gradient Tool

In graphic design, gradients produce more color tones, creating eye-catching visuals that direct a viewer's perspective. For example, you can capture a buyer's attention toward a room's wall design from a gradient's subtle hue changes. This is another way to create a shape color in Photoshop.

Step 1: Modify the Gradient Settings

You first need to change the gradient settings so you can customize the gradual blend between colors.

  1. Head to Layer, expand the New Fill Layer options and click on Gradient.
  2. Put the gradient fill above the shape layer.
  3. From the Gradient Editor, launch the Basic folder, and choose the Black, White gradient preset.
  4. Double-click on the black-and-white color swatches to change the color of the gradient preview. Click OK once satisfied.
  5. You can also modify the settings for the gradient's look. For instance, choose the Linear Gradient option if you want the gradient to transition in a line from one hue to another.
  6. Modify the angle to alter where the gradient comes from.
  7. Click OK to exit the gradient fill options when you're done with the settings.
Modify the Gradient Settings

Step 2: Fit the Color Within the Parameters of the Shape

You'll notice that the gradient will cover the entire canvas. Right-click the gradient layer, then select Create Clipping Mask to fill the shape with a gradient.

This should make the gradient only visible inside the shape layer you clipped it to.

Fit the Color Within the Parameters of the Shape

Related Questions

Why Can't I Change a Shape's Color in Photoshop?

If you can't change a shape's color, you may have a pixel layer instead of a shape layer. Therefore, you should also check if you have selected the shape layer and a shape tool so you can change the colors in the swatches.

How to Fill Shapes in Photoshop Using Images?

To fill a shape in Photoshop with a photo, you first need to select the area you want to fill and choose the layer in the Layers panel. Next, go to Edit, expand the Fill Layer settings, and click on Fill Section. After that, select the necessary options in the Fill dialog box, and click OK.

How to Fill Text With Color in Photoshop?

One way to fill a text with color in Photoshop is to click on the area you need to fill and use the Paint Bucket tool to apply color. Another option is to select the Gradient tool, then click and drag the cursor over the area you need to fill. Lastly, you may use the Brush tool to paint over the area manually.

Conclusion

With these easy-to-follow steps, you can successfully change any shape's color in Photoshop. You can use the Fill and Stroke settings, Paint Bucket tool, fill layer, and Gradient tool. Whether you want a solid color or a gradient effect, you can maximize shapes to add elements to your real estate photos.

Vendors

Rela Logo
CS6 PSE Logo
HD Photo Hub Logo
FullFrame Logo

Learning Topics

.
magnifiercrossmenucross-circle