


Congratulations to Javier Sotomayor, November 2023 PFRE Photographer of the Month! The theme this month was "Open." Javier Sotomayor - Entry #879 Dave Koch - Entry #877 Peter Wingfield - Entry #874 Here's what Javier has to say: Hello First of all I wa ...


As an Amazon Associate we earn from qualifying purchases.
If you take real estate exterior photos with some parts of the property under direct sunlight and others under heavy shadows, the camera might fail to balance the lighting. Knowing what a light meter on a camera is can help you bypass the auto settings for better exposure.
Quick Navigation
A light meter on a camera is a system that measures the intensity of light in a scene, helping the camera determine the correct exposure settings for a particular shot. It can also guide you in adjusting the aperture, shutter speed, and ISO settings to achieve the correct exposure for a given lighting condition when using the manual mode.

The meter can be built-in or a separate device that attaches to the camera. The meter can use one of the following modes to ensure that the photograph is not underexposed or overexposed.

This mode is also known as matrix metering, multi-segment metering, or advanced metering mode, depending on the camera brand. It measures the light in a scene using multiple zones or segments and then applies the appropriate exposure settings to the entire image.
The camera divides the scene into multiple zones or segments and analyzes each for brightness, contrast, and color values. It then evaluates these readings and applies a weighted average to determine the appropriate exposure settings for the entire image.
This ensures that the exposure is balanced across the image by considering the varying lighting conditions and colors in the scene, resulting in a well-exposed image. However, it may not be suitable for high-contrast scenes or scenes with strong backlighting.
Center-weighted mode measures the light in a scene by prioritizing the center and then applying the appropriate exposure settings to the entire image. After evaluating the frame’s center, the meter progressively reduces the weight of the surrounding areas as they move toward the edges of the frame.
This means that the center of the frame is given more importance than the surrounding areas when determining the exposure settings. This mode is particularly useful in situations where the main subject is at the center or where the lighting in the scene is more uniform in the center than at the edges.
This mode is excellent for portraits and close-ups, where the subject is typically positioned in the center or in situations where the lighting is coming from behind the subject, creating a silhouette effect.
Spot metering measures the light in a specific area of the frame and then applies the appropriate exposure settings to that area only. Usually, this area is a small, defined spot in the center of the frame or in a specific area you select on the frame, and the camera ignores the rest of the scene.
Spot metering is particularly useful when there is a high contrast between the subject and the background or when the lighting conditions in different areas of the frame are drastically different.
For instance, you can use it in real estate interior
If you are shooting in situations with significant lighting differences, such as taking real estate interior photos with the windows open, you can use the following steps to gain control over your camera's internal light meter.
Evaluative metering mode is easier to use as it's the default metering mode in most digital cameras and is suitable for most shooting situations, including landscapes, portraits, and real estate exterior photography, where the lighting conditions may vary widely.
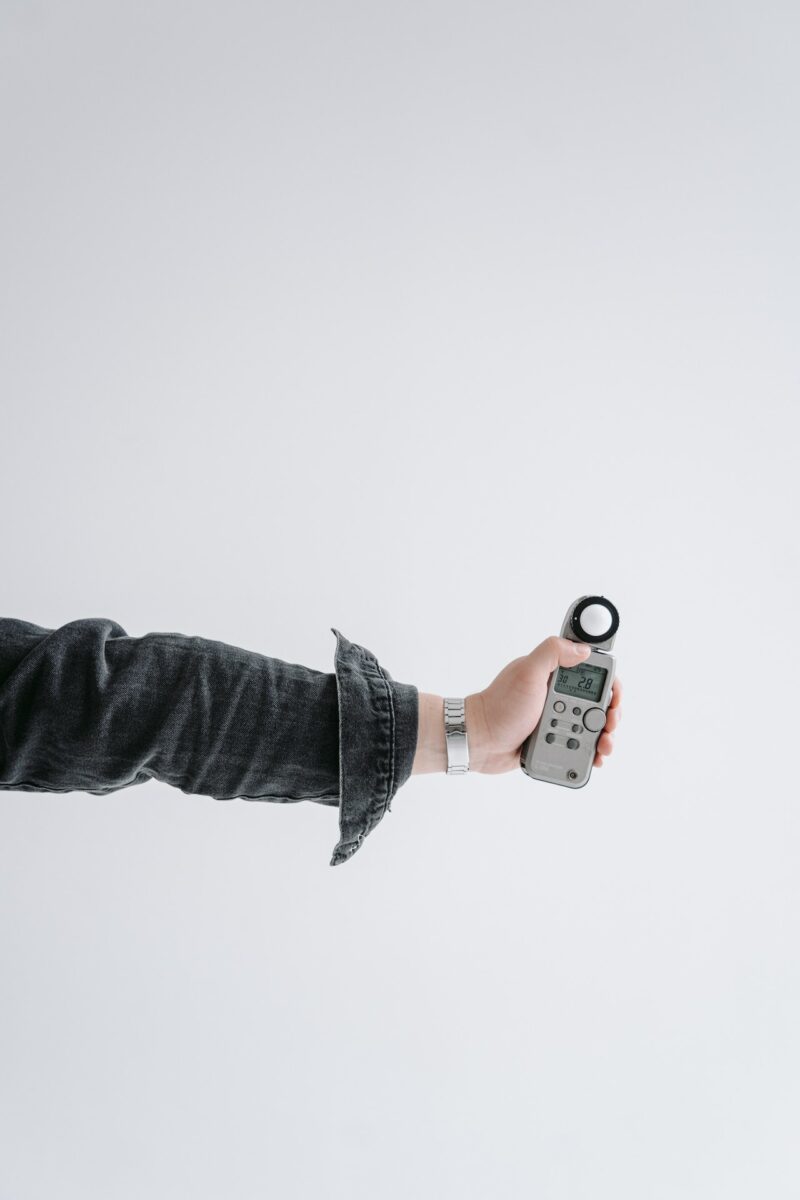
An external camera light meter can be considered more accurate than internal camera light meters because it measures the light reflected from the subject rather than the light entering the camera.
Yes, you can bypass the camera meter using the exposure compensation setting. This allows you to intentionally underexpose or overexpose your image more than the light meter suggests.
Learning what a light meter on a camera is can help you shoot photos with better contrast and exposure by knowing when to override the exposure suggested by the camera. Simply set your camera to manual mode, and adjust the shutter speed and aperture.


