PFRE-Logo-white-bg
Reading
blue-triangle-element

Articles

PFRE is the original online resource for real estate and interior photographers. Since 2006, it has been a community hub where like-minded professionals from around the world gather to share information with a common goal of improving their work and advancing their business. With thousands of articles, covering hundreds of topics, PFRE offers the most robust collection of educational material in our field. The history of real estate photography has been documented within these pages.
All Articles
blue-triangle-element

Latest

Image banner for the November 2023 PFRE Photographer of the Month Winner Javier Sotomayor, with a featured image of his winning photo titled "Open"

Congratulations to Javier Sotomayor, November 2023 PFRE Photographer of the Month! The theme this month was "Open." Javier Sotomayor - Entry #879 Dave Koch - Entry #877 Peter Wingfield - Entry #874 Here's what Javier has to say: Hello First of all I wa ...

Contest
blue-triangle-element

OVERVIEW

For over a decade, photographers from around the world have participated in PFRE’s monthly photography contests, culminating in the year-end crowning of PFRE’s Photographer of the Year. With a new theme each month and commentary offered by some of the finest real estate & interior photographers anywhere, these contests offer a fun, competitive environment with rich learning opportunities. 

Contest Rules
blue-triangle-element

CURRENT CONTESTS

View / Submit
blue-triangle-element

PAST CONTESTS

View Archive
Resources
blue-triangle-element

Resources

PFRE prides itself on the depth and breadth of the information and professional development resources it makes available to our community. Our goal is to help real estate and interior photographers be successful while bringing the community together and elevating the industry as a whole.
blue-triangle-element

Conference News

No items found

How to Create a Clipping Mask in Photoshop

Published: 04/04/2023

As an Amazon Associate we earn from qualifying purchases.

Clipping masks let you make selective adjustments to specific layers in Photoshop. You can use this masking technique to fix exposures and control certain effects when editing real estate photos. Here is a step-by-step-guide on how to create a clipping mask in Photoshop.

How to Create a Clipping Mask in Photoshop

To form a clipping mask, you must first create two or more layers, one for the underlying object and another for the overlay. Afterward, go to the menu, click Layer, and select Create Clipping Mask. You can also use the keyboard shortcut Ctrl + Alt + G (Windows) or Command + Option + G (macOS).

Clipping masks are powerful Photoshop tools because you can use them to edit various elements in Photoshop, especially when you need to control visible layers and spot adjustments. By the end of this post, you'll see how you can improve your real estate photo edits.

Creating a Clipping Mask to Add an Object

Decorations can tell a lot about the lifestyle of people who will live in a house. However, there may be occasions when there needs to be more furniture or displays put in a house. 

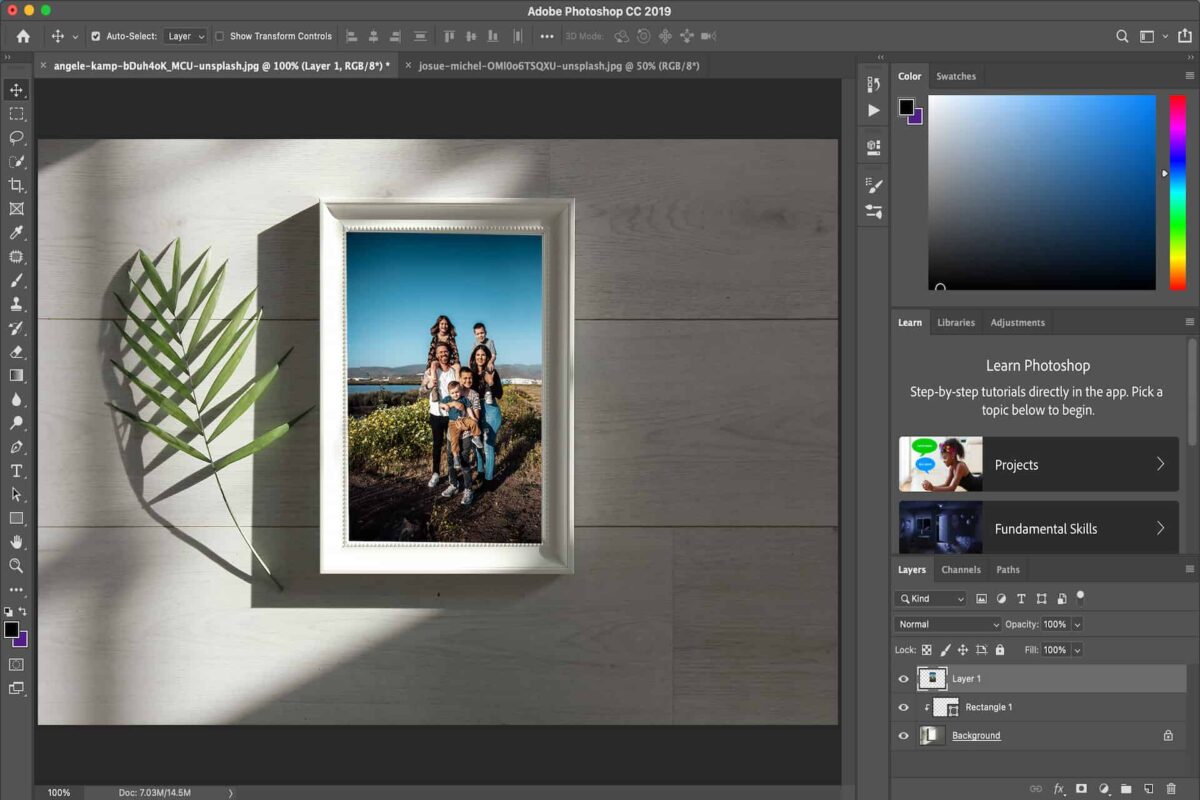
When staging a property, you need to decorate it in a way that gives a sense of ownership. You can decorate real estate photos using clipping masks to put a different image on a picture frame.

Opening an Image in Photoshop

Step 1: Set up a Document

Open an image of an empty picture frame. Open the photo you want to overlay in the frame.

Adding a rectangle in the image of a white frame near a green fern placed on a wooden table using the Rectangle tool in Photoshop

Step 2: Create a New Layer to Put a Shape

You need to create layers to make a path for the mask.

  1. Select the top layer or the layer where it will be clipped to the layer below it. Layer 0 (top layer) will be clipped to Layer 1 (bottom layer).
  2. Press Shift + Ctrl + N (Windows) or Shift + Command + N (macOS) to create a new layer.
  3. Go to the Layers tab and click the Create a New Layer icon.
  4. Click on the Rectangle tool and draw your desired shape on the new layer. Don't fill it with color.
Adding an image of a family of six standing on brown soil overlooking the sea to the white frame on top of a wooden table

Step 3: Create a Third Layer and Add the Picture

You also need to create a new layer before you drag the other photo onto it.

  1. Press Enter to put the picture in place. Remember that this is the layer you're going to clip.
  2. Check to see if you have three layers. There should be one at the bottom, which has an empty picture frame. On top of it shows the shape you drew, while the last must be the picture you will add.
Create Clipping Mask in Photoshop

Step 4: Form Clipping Masks

This final step will let the photo take the shape of a rectangular frame. You can use clipping masks to have more control over the adjustments.

  1. Select the top layer from the Layers panel.
  2. From the menu, click on Layer, then choose Create Clipping Mask. Alternatively, press Ctrl + Alt + G (Windows) or Command + Option + G (macOS). The top layer should turn into a mask.
  3. You can reposition the content to fine-tune the edit. Select the uppermost layer, click the Move tool, then press V.
  4. Click and drag around the photo you placed inside the picture frame.
  5. You can further transform content within the mask you created. Go to the Transform menu, then select the Skew tool to tweak the mask to change proportions.
An image of a family of six on a white picture frame near a green fern placed on top of a brown wooden table

Creating a Clipping Mask to Edit a Portrait Background

Whether you're a real estate agent or photographer looking to update your professional portrait, the image background can dramatically influence how people will see you. An effective background can grab attention, add a story, and provide valuable information about your work.

This is why even if you only used a plain background during your shoot, you may still change it into something more relevant by using clipping masks in Photoshop.

Open an image in Photoshop CC 2019

Step 1: Set up the Image

Start by opening a portrait in Photoshop. Go to File, click Open, and select the image you want to use.

Click on the lock icon on the layer. Unlocking the layer in Photoshop is a vital step because this ensures transparency as you form a mask.

Using Color Range in Photoshop to edit an image of a woman with long brown hair wearing a black long sleeves shirt near a white wall

Step 2: Select Color Range

The next step is to remove the white background and turn it transparent.

  1. Use any Selection tool you feel is convenient. For this example, you can use the Objection Selection tool.
  2. Choose the Color Range options.
  3. Click on multiple selection icons to reduce the fuzziness.
  4. Click on the background to turn it white while keeping the object black.
  5. Press Enter to apply the selection if the object still has white in some parts.
Using a Brush tool in Photoshop

Step 3: Add a Layer Mask

You must add a layer mask to modify the selection during the masking mode.

  1. Go to the bottom of the Layer panel, then click on the layer mask icon.
  2. Hold the Ctrl/Command key, then click on the mask icon from the layer.
  3. Pick the Brush tool and paint black on the entire object.
  4. Double-click on the layer.
  5. Choose Invert from the properties to make the background transparent.
Drawing a circle in an image of a woman with long brown hair wearing a black long sleeves shirt using the Ellipse tool in Photoshop

Step 4: Draw a Circle on the Object

Once you have a transparent background, you can generate a mask effect.

  1. Select the Ellipse tool.
  2. Draw a circle on the object.
  3. To draw a circle on the object, press and hold the Shift key while dragging the mouse over the object.
  4. Place the Ellipse layer below the primary layer after drawing the circle.
  5. Press Ctrl + J to copy the primary layer.
  6. Hide the copied layer while keeping the other two layers visible.
Using the Create Clipping Mask in Photoshop CC 2019

Step 5: Set the Clipping Mask

Now, you can form clipping masks to give a cohesive look between the portrait and the background.

  1. Click on the primary layer.
  2. Go to Layer, then choose Create Clipping Mask. This should hide everything outside the circle.
  3. Enable the top layer.
  4. Choose the Brush tool, then click on the mask icon to erase the lower part of the circle.
Changing the circle's background color in Photoshop

Step 6: Change the Circle's Background Color

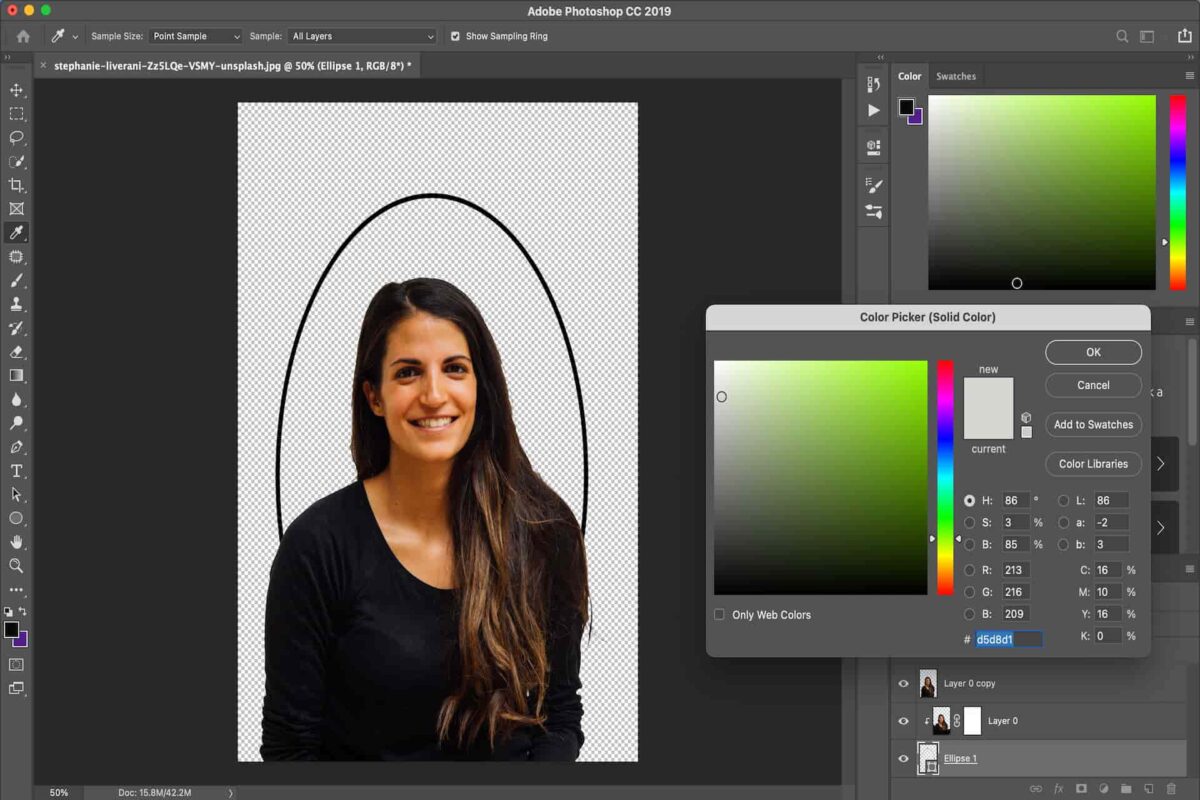
This is the part where you can modify the circle.

  1. Double-click on the ellipse layer to see the circle's color-changing part.
  2. Click on the Color Range options to choose any color you want for the background.
  3. Once satisfied with the background, go to the File option to save the final edit.

Related Questions

What Is the Difference Between Clipping Masks and Layer Masks?

A clipping mask enables you to create masks by clipping one or more layers to another layer or layer group. Consequently, the bottom layer's pixels determine what you can see above. Meanwhile, a layer mask controls the visibility of the layers you apply.

How to Release Clipping Masks?

To release the masks, go to the Layers panel, then select any layer other than the primary layer. Head to Layer and click on Release Clipping Mask. If you need to remove a layer, hold down Alt/Option, position the pointer over the line separating the grouped layers, then click to remove.

Why Can't I Produce Clipping Masks?

If you can't produce clipping masks, it's likely that you're only working on a single layer. Remember that the masks only work when you have an underlying object and overlay. Both of these should be visible, with the underlying layer having filled-in pixels, so you have a path to work on.

Conclusion

Creating a clipping mask in Photoshop will help you form composites, enhance texts, and insert elements in specific areas. Make sure you have two layers to enable clipping masks. Once you master this technique, you can fine-tune your real estate photo adjustments in Photoshop easily and naturally.

Vendors

Rela Logo
CS6 PSE Logo
HD Photo Hub Logo
FullFrame Logo

Learning Topics

.
magnifiercrossmenucross-circle