PFRE-Logo-white-bg
Reading
blue-triangle-element

Articles

PFRE is the original online resource for real estate and interior photographers. Since 2006, it has been a community hub where like-minded professionals from around the world gather to share information with a common goal of improving their work and advancing their business. With thousands of articles, covering hundreds of topics, PFRE offers the most robust collection of educational material in our field. The history of real estate photography has been documented within these pages.
All Articles
blue-triangle-element

Latest

Image banner for the November 2023 PFRE Photographer of the Month Winner Javier Sotomayor, with a featured image of his winning photo titled "Open"

Congratulations to Javier Sotomayor, November 2023 PFRE Photographer of the Month! The theme this month was "Open." Javier Sotomayor - Entry #879 Dave Koch - Entry #877 Peter Wingfield - Entry #874 Here's what Javier has to say: Hello First of all I wa ...

Contest
blue-triangle-element

OVERVIEW

For over a decade, photographers from around the world have participated in PFRE’s monthly photography contests, culminating in the year-end crowning of PFRE’s Photographer of the Year. With a new theme each month and commentary offered by some of the finest real estate & interior photographers anywhere, these contests offer a fun, competitive environment with rich learning opportunities. 

Contest Rules
blue-triangle-element

CURRENT CONTESTS

View / Submit
blue-triangle-element

PAST CONTESTS

View Archive
Resources
blue-triangle-element

Resources

PFRE prides itself on the depth and breadth of the information and professional development resources it makes available to our community. Our goal is to help real estate and interior photographers be successful while bringing the community together and elevating the industry as a whole.
blue-triangle-element

Conference News

No items found

How to Use the Mixer Brush in Photoshop

Published: 20/07/2022

As an Amazon Associate we earn from qualifying purchases.

Photoshop is a sophisticated photo-editing software that allows you to design graphics and enhance the appearance of the photos. If your real estate property photos are not appealing enough, knowing how to use the mixer brush in Photoshop will help you change and improve their appearance.

How to Use the Mixer Brush in Photoshop

A mixer brush is a brush in Photoshop that allows you to blend the brush color with the background color. It provides you with various painting techniques such as putting colors together on a brush, combining colors on the canvas and applying different paint wetness across a stroke.

It allows you to set both the rate at which the paint of the canvas dries and the amount of color you will pick from the region you are painting on. The following steps will help you set the right brush size, intensity, and color mixes for digital art and skin retouching.

Duplicate the Background Layer

Open the photo you will be working on in Photoshop by going to File and clicking on Open from the menu that pops up. Once the windows file explorer opens if using a Windows PC or the Mac Finder opens if you’re using a Mac, scan through your images to locate your image.

Selecting the Duplicate Layer tool in Photoshop for an image of a nude colored sofa in a modern living room

Considering there are higher chances of making a mistake while painting, it is advisable to work on the duplicate layer and preserve the original layer as a backup. Usually, opening an image in Photoshop makes it open as a locked background layer by default.

Right-click the background layer and then click on Duplicate Layer from the menu that appears. Normally, the properties panel of the new layer will appear, requiring you to rename the duplicate layer you created. Enter a name that can help you keep track of your layer edits, and then click OK to confirm.
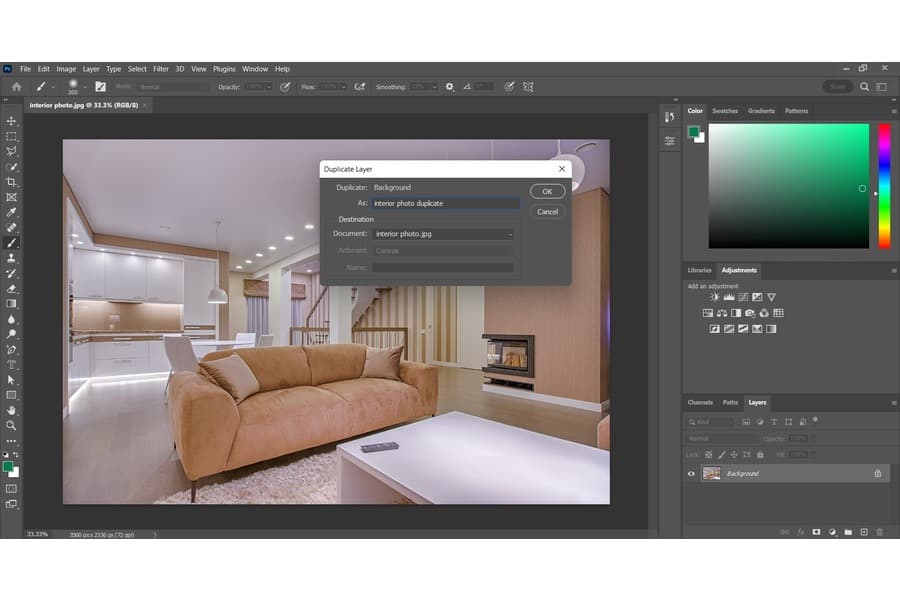
Renaming the newly created duplicate layer for an image of a brown sofa in the guest entertainment room

Select the Mixer Brush Tool

The Mixer Brush tool is one of the brush tool options in your toolbar. In order to access it, right-click on the paintbrush tool icon to open up a dialogue box. A dialogue box with four options will appear. Locate the Mixer Brush Tool and then select it to pick it.

Selecting the Mixer Brush Tool in Photoshop to edit an image of a light brown sofa in the sitting room

Alternatively, you can select it by pressing the B key on your keyboard. Click on the brush size icon to set the tip and brush size of your choice. Alternatively, you can click on the right bracket key ] on your keyboard to increase the size of the brush and the left bracket key [ to reduce the size of the brush.

It’s advisable to set a brush size that will cover the entire patch or area you want to edit with a few strokes. Usually, this makes the blending look more natural and realistic.

Set the Color of the Brush

Usually, you can set the foreground color using the swatches panel, color panel, or color picker. Select the color picker by clicking on the Background or Foreground color square.

Selecting the color of the brush in Photoshop to edit an image of a nude colored sofa in a family room

Set your desired color, and the selected color will appear on the Color Preview. Additionally, you use keyboard shortcut keys Shift + Alt + right-click on your Windows PC or Shift + Option + Command + click on Mac OS.

Ensure the selected color blends well with the region you are painting, and then click OK to confirm and close the color picker.

Paint

With the color selected, hold down the mouse button and apply the new color to the image. For instance, if your image is painted red, you can select the brush and paint over the red patch with a blue color.
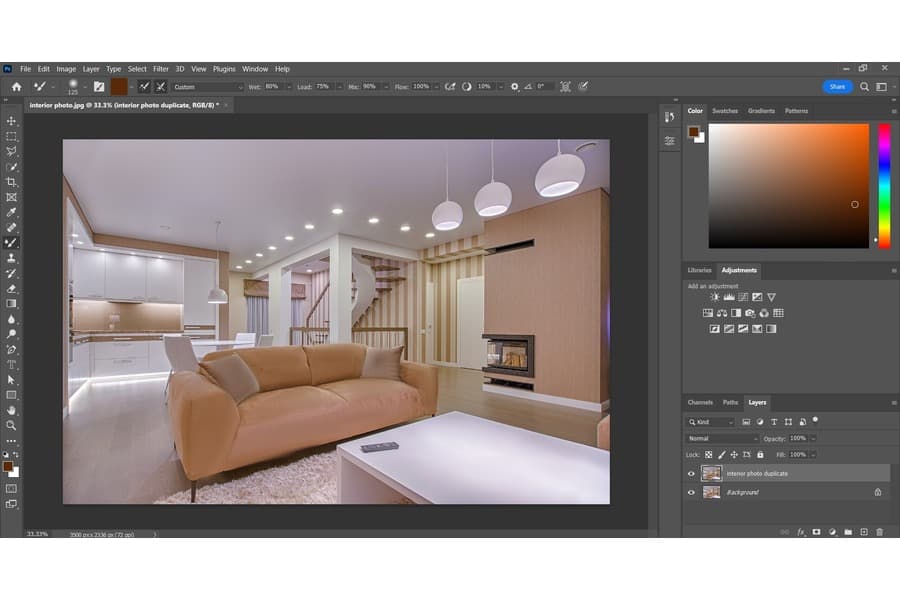
Applying the color red to a Photoshopped image of a nude-colored sofa in a modern living room

The brush will pick up the red color, blend it and add a hint of blue to produce purple from the two colors. If you want the brush to do away with a color you have added to your canvas, click the arrow near the color picker square and choose Clean Brush.

Typically, the clean brush option cleans all the colors from the brush, enabling you to blend out colors. You can use this brush several times or fill the brush again with the color you used. Click the arrow near the color picker square to fill the brush again and choose the Load Brush option.

Mixer Brush Tool Options

There are different options in this brush tool that can add varying effects on the image colors. Usually, the variations affect how far the color spreads and how the brush mixes colors. Depending on the complexity of your real estate images and the color improvements they need, you can use one of the following brush options.

Selecting a custom mixer brush tool option in Photoshop to edit an image of a brown colored sofa in a lounge room
  • Mix: Mix refers to how much of the two colors, that of the canvas and that of the brush, will appear when you apply the colors. Like the wet option, it has a value from 0-100%. Since the brush does not pick any color if the wet is set to zero, this option functions when the wet value is more than zero.
  • Brush size: The brush size option is similar for all brushes. It allows you to change the size of the brush, allowing you to cover the entire patch in a few strokes.
  • Wet: The wet configuration refers to the amount of color the brush picks from the region you are painting on. Like the Mix, it has a value of 0-100%. The lower the wet setting, the less the paint mixes, and the higher the value, the more the color mixes.
  • Load: The Load option determines the amount of paint loaded on the main brush reservoir. If you have a low load configuration, you will get short brush strokes, and the paint will dry out quickly. If you increase the load settings, you will get longer brush strokes.
  • Flow: The flow configuration helps regulate how fast the paint is built up after every stroke. Although it has values within the range of 0-100%, the flow is set to 100% by default.
  • Current Brush Load: It displays the current color that has filled the brush. If you click on this option, it brings up other varying options, such as the clean brush option for cleaning the brush, the load brush option for reloading the brush with color, and the load solid color option.
  • Smoothing: Considering that Photoshop lays down pixels based on the path you are making with your cursor, it doesn't make smooth strokes due to handshakes. The smoothing option helps reduce shakiness in the brush strokes to enhance smoothness.
  • Clean brush after every stroke: It ensures you start every stroke with a clean brush while picking up the color. If this option is not checked, the brush maintains some of the colors of your previous stroke, resulting in contamination.
Photoshopped image of a nude colored sofa in a modern living room that used mixer brush tools

Frequently Asked Questions

Why Isn’t My Mixer Brush Not Working?

The brush may not blend colors effectively if you don’t set the wet and mix values high enough. You can try solving this issue by setting your wet and mix values high to get the blending effect. Keep in mind that third-party brushes can also come with bugs that can affect the mixer brush.

Can I Erase Mixer Brush Strokes From an Image?

You can get rid of brush strokes on a photo by holding down the tilde key (~) on your keyboard while clicking and dragging your mouse on the regions you need to erase. Additionally, you can get rid of brush strokes on a separate layer by switching the blend mode to clear.

Final Thoughts

Knowing how to use the mixer brush in Photoshop allows you to improve the appearance of your real estate photos and create impressive effects. Remember to choose a color that can blend well with the region you are painting and apply some smoothening to reduce the shaky appearance.

Vendors

Rela Logo
CS6 PSE Logo
HD Photo Hub Logo
FullFrame Logo

Learning Topics

.
magnifiercrossmenucross-circle