PFRE-Logo-white-bg
Reading
blue-triangle-element

Articles

PFRE is the original online resource for real estate and interior photographers. Since 2006, it has been a community hub where like-minded professionals from around the world gather to share information with a common goal of improving their work and advancing their business. With thousands of articles, covering hundreds of topics, PFRE offers the most robust collection of educational material in our field. The history of real estate photography has been documented within these pages.
All Articles
blue-triangle-element

Latest

Image banner for the November 2023 PFRE Photographer of the Month Winner Javier Sotomayor, with a featured image of his winning photo titled "Open"

Congratulations to Javier Sotomayor, November 2023 PFRE Photographer of the Month! The theme this month was "Open." Javier Sotomayor - Entry #879 Dave Koch - Entry #877 Peter Wingfield - Entry #874 Here's what Javier has to say: Hello First of all I wa ...

Contest
blue-triangle-element

OVERVIEW

For over a decade, photographers from around the world have participated in PFRE’s monthly photography contests, culminating in the year-end crowning of PFRE’s Photographer of the Year. With a new theme each month and commentary offered by some of the finest real estate & interior photographers anywhere, these contests offer a fun, competitive environment with rich learning opportunities. 

Contest Rules
blue-triangle-element

CURRENT CONTESTS

View / Submit
blue-triangle-element

PAST CONTESTS

View Archive
Resources
blue-triangle-element

Resources

PFRE prides itself on the depth and breadth of the information and professional development resources it makes available to our community. Our goal is to help real estate and interior photographers be successful while bringing the community together and elevating the industry as a whole.
blue-triangle-element

Conference News

No items found

How to Add Light in Photoshop

Published: 01/04/2022

As an Amazon Associate we earn from qualifying purchases.

In most cases, you will need to switch off the background lights when shooting real estate interior photos to prevent glare and ghosting. Knowing how to add light in Photoshop can help you lighten those light sources afterward and make the photo aesthetically pleasing.

How to Add Light in Photoshop

Regardless of your photography skills and the camera quality, capturing background lights without glare can be challenging. Knowing how to add light in Photoshop will allow you to shoot using flashlights or ambient lighting and then add the background lights later. 

Real estate image

Typically, Photoshop is a versatile photo-editing application that allows you to add light to your photos using different methods. Although the best method will depend on your desired results, using the lighting effects filter is one of the most effective ways of adding light in Photoshop.

Create a New Layer

The first step is to open the photo you want to add the light to in Photoshop and then copy the background layer. Creating a copy of the background layer will make your edits non-destructive, and you can use your original image for reference.

In the layers panel, click and drag the background layer to the new layer button at the bottom of the panel. You can also use the keyboard shortcut keys Ctrl + J if using a Windows PC or command + J if you are using a Mac.

It is advisable to rename the new layer to keep track of your workflow. Select the layer from the layers menu and then choose layer properties. Once the dialogue box pops up, enter the layer's name in the name text box and click OK.

Image being edited in Photoshop

Convert the New Layer Into a Smart Object 

If you want to later change the edits such as the positioning, the softness, and the hardness of the lights, it's advisable to change the layer into a smart object. Navigate to Filters on the menu bar, choose the Convert for Smart Filters option and click OK.

Converting the new image layer into a Smart Object

Add the Lighting Effects

Photoshop features a lighting effects filter that allows you to add light to an image more straightforwardly. Open the lighting effects dialogue box by navigating to filter on the top menu bar, selecting render, and choosing lighting effects. 

Depending on the lighting effects you desire, you can choose any of the following effects in the dialogue box:

  • Point light: The lighting effects of a point light are similar to the lighting effects of a naked light bulb. The rays of light travel outward from the light source in all directions. In photoshop, it is an area of light that you can move around.
  • Spotlight: The lighting effects of a spotlight are similar to the lighting effects of a small searchlight. The effect will be more intense illumination in a well-defined image region.
  • Infinite light: Unlike the spotlight and the point light, the infinite light falls over the image. However, it is still directional, and you can change the direction.

Keeping in mind that the photo might have some ambient lighting, using a spotlight is advisable as the lighting effects can be more aesthetically pleasing.

Image being rendered with lighting effects

Position the Source of Light

You can change the positioning of the spotlight in your photo by clicking and dragging it. Play around with the different adjustment points to change its shape, and make it smaller or bigger. If you want a significantly bigger spotlight, you can zoom out the image and then adjust the size of the lighting.

Typically, making the spotlight bigger will also make it softer. Use the ctrl + or - to zoom in and out if you're using a Windows PC or command + or - to zoom in and out if using a Mac.

Positioning the light source in Photoshop

Adjust the Colors

You can also adjust the color and the intensity of the light the spotlight illuminates to match and blend with the subject.

  1. Click on the color, choose hue to get the options of a color picker, and then select the color.
  2. If the color is saturated, drag the saturation slider to the left to decrease the saturation.
  3. You can also decrease the intensity to make the color more realistic. Simply drag the intensity slider to the left.
  4. Considering that the photo might have some ambient lighting, use the ambient lighting slider to balance the lighting effects with the ambient light.
  5. Once you are satisfied with the color settings, hit OK to confirm.

Since you already converted the lighting effects into a smart object, you only need to double-click it to go back to the settings if necessary.

Adjusting the colors of an image in Photoshop

Select the Subject

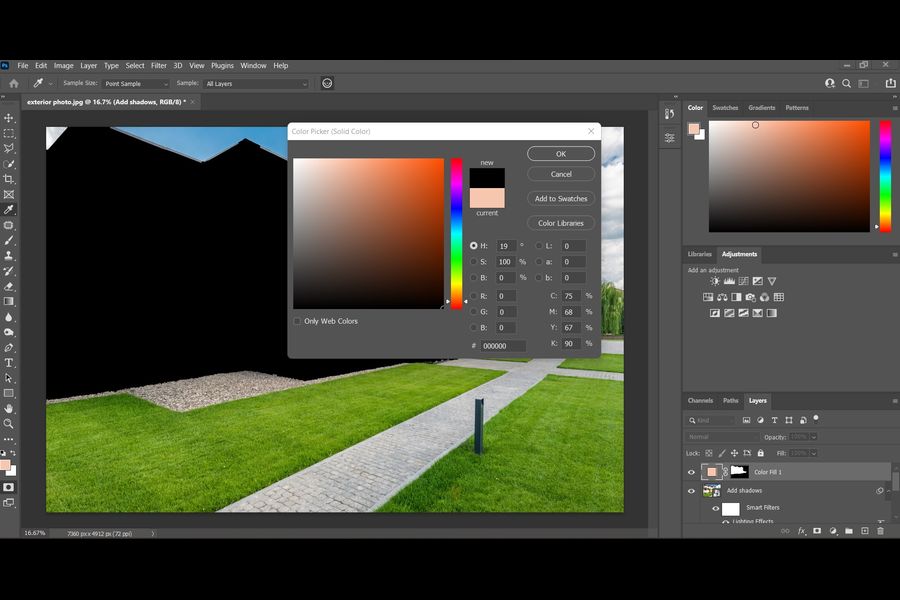
Adding a spotlight without adding shadows will make the lighting effect unrealistic. However, you will need to select the subject first for you to add the shadows.

  1. Click on the visibility icon of the lighting effects layer to get back to the background layer.
  2. Pick the quick selection tool and choose the select subject on the top menu bar. Note that Photoshop artificial intelligence might take some time to select the subject depending on your computer performance.
  3. Depending on the complexity of your photo, you can also manually select the subject.
  4. Press the letter Q on your keyboard to open the quick mask mode. Note that any area in red is not selected, and any area in its original color is selected.
  5. You can remove some areas from the selection by picking a brush, setting the foreground color to black, and then painting on those areas.
  6. On the other hand, you can include some areas into the selection by picking a brush, setting the foreground color to white, and then painting those areas.
  7. Once you are satisfied with the quick mask mode results, you can press the letter Q on your keyboard to get back to the selection.[s
  8. Save the selection by navigating to select and then choose Save the Selection.
  9. Specify the name of the selection and then save. Typically, the selection will be saved in a new channel.
Saving an edited image in Photoshop

Create the Outer Shadows

The best way to create shadows and avoid funky edges is to create them above the subject. With the selection still active, click on the visibility icon of the lighting effects layer.

  1. Create a new layer and then fill it with black.
  2. Hit the alt + backspace on your keyboard if you're using a Windows PC or option + delete if you're using a Mac to fill the area in the selected layer with black.
  3. Press command + D if using a Mac or Ctrl + D if you're using a Windows PC to deselect.
  4. Since you will want to arrange the shadows according to the light, press command + T if using a Mac or Ctrl + T using a Windows PC to open the transformation.
  5. Zoom out the image, hold the Ctrl or Command keys on your keyboard, and adjust the edges. Typically, this will allow you to distort the shadows following the curvature of the light.
  6. Once you're satisfied with the shadows, hit enter or return.
  7. Navigate to the channels, choose the selection you saved and then hold the ctrl or command keys and click on its thumbnail. Typically, this will make a selection of the selection you saved.
  8. Navigate back to the previous layer and then click on the mask button.
  9. Considering that the shadow is above the subject, select it and then press ctrl or command I to invert it. At this point, you'll have a shadow following the curvature of the light.
Adjusting the image using the lighting effects layer
Adjusting the shadows in Photoshop
Adjusting the brightness and contrast of an image

Add Some Blur

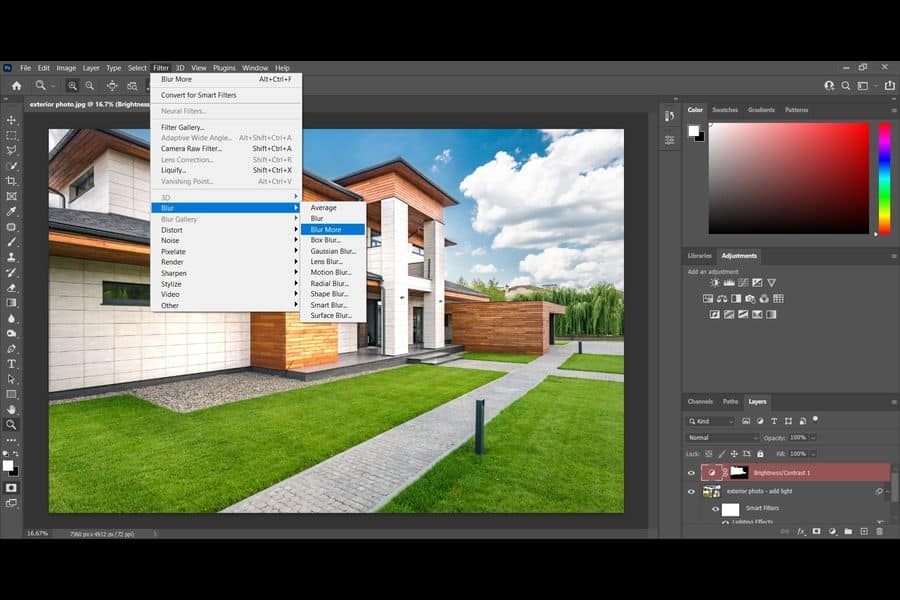
Considering that the light will blur as it gets farther away from the spotlight, the shadows also need to blur as they get nearer to the spotlight to look realistic. Navigate to Filter, Blur Gallery, and then choose Field Blur.

Click on the link icon between the layer and the mask to unlink the mask. Add blur to the photo until the lighting and the shadows look realistic. Once satisfied with the shadow blurring, click OK to confirm.

Adding a Blur effect in an image

Create the Inner Shadows

Depending on the subject and the direction of light, you might need to include some inner shadows to make the lighting look realistic. Create a curves adjustment layer, click and drag it down. Select the mask and then press command or ctrl I to invert.

Pick the brush, make it smaller and softer, select a low flow of around 4%, zoom in on the photo and then paint the inner shadows. At this point, you will have your photo with the light source, the outer and inner shadows looking realistic.

Editing an image in Photoshop
Image of a real estate property for sale

Final Thoughts

Knowing how to add light in Photoshop can help you emphasize the main subject in your real estate photo by adding a spotlight effect above it and applying shadows to hide the other elements. Work on the outer and inner shadows to make the effect realistic.

Vendors

Rela Logo
CS6 PSE Logo
HD Photo Hub Logo
FullFrame Logo

Learning Topics

.
magnifiercrossmenucross-circle