PFRE-Logo-white-bg
Reading
blue-triangle-element

Articles

PFRE is the original online resource for real estate and interior photographers. Since 2006, it has been a community hub where like-minded professionals from around the world gather to share information with a common goal of improving their work and advancing their business. With thousands of articles, covering hundreds of topics, PFRE offers the most robust collection of educational material in our field. The history of real estate photography has been documented within these pages.
All Articles
blue-triangle-element

Latest

Image banner for the November 2023 PFRE Photographer of the Month Winner Javier Sotomayor, with a featured image of his winning photo titled "Open"

Congratulations to Javier Sotomayor, November 2023 PFRE Photographer of the Month! The theme this month was "Open." Javier Sotomayor - Entry #879 Dave Koch - Entry #877 Peter Wingfield - Entry #874 Here's what Javier has to say: Hello First of all I wa ...

Contest
blue-triangle-element

OVERVIEW

For over a decade, photographers from around the world have participated in PFRE’s monthly photography contests, culminating in the year-end crowning of PFRE’s Photographer of the Year. With a new theme each month and commentary offered by some of the finest real estate & interior photographers anywhere, these contests offer a fun, competitive environment with rich learning opportunities. 

Contest Rules
blue-triangle-element

CURRENT CONTESTS

View / Submit
blue-triangle-element

PAST CONTESTS

View Archive
Resources
blue-triangle-element

Resources

PFRE prides itself on the depth and breadth of the information and professional development resources it makes available to our community. Our goal is to help real estate and interior photographers be successful while bringing the community together and elevating the industry as a whole.
blue-triangle-element

Conference News

No items found

How to Center an Image in Photoshop

Published: 07/06/2021

As an Amazon Associate we earn from qualifying purchases.

Adjusting an image's position accurately is a typical process in Photoshop. To design compelling visuals, it is essential to learn techniques that automatically position and align elements wherever you want them. Learn how to center an image in Photoshop accurately and quickly. 

How to Center an Image in Photoshop Accurately and Quickly

Placing an image in the exact center of the canvas may seem like a lot of work. You may be apprehensive that finding the correct pixel position will be difficult and time taking as you have to work with measurements and show great precision. 

On the contrary, you may rely on your vision and manual positioning and end up with an unprofessional design. If you are tempted to do it in an improper way, remember that the inconsistency in design will bring inconsistency on your social media grid, website, or wherever you post the image. 

The first method that I am about to describe is the quickest and most effective way of placing the image in the center meticulously. I will also explain how guides can be helpful for you in certain scenarios. The method is not only for the images but also for layers, text, objects, and other elements in Photoshop.

Center an Image Using the Marquee Tool

  1. Open your image in Photoshop by either pasting it on a new document (FILE > NEW) or directly opening it  (FILE > OPEN).

Convert the Background Into a Smart Object

  1. Unlock the Background layer by pressing on the small padlock icon beside it in the Layers Panel.
  2. Convert the image into a smart object so that it is not stretched or compressed unnaturally. Right click on the image layer and select Convert to Smart Object.

Resize the Image

  1. Using the transform mode, resize the image so that it is smaller in size than the canvas. 
  2. Use CTRL + T (Windows) or CMD + T (on Mac) to transform. After resizing, commit by clicking on the checkmark in the options bar. 

Use the Marquee Tool for Selection

  1. Now select the entire frame by using the Marquee tool from the toolbar. Drag a rectangle encompassing the whole canvas.
  2. Select the image layer from the layer panel.

Align the Image Vertically and Horizontally to the Center

  1. Select the Move tool from the toolbar.
  2. Click on the Align Horizontal Centers and Align Vertical Centers icons from the Move Tool options bar at the top. Your image will be precisely centered.  
Aligning the Image vertically and horizontally to the center in Photoshop
  1. Press CTRL + D on Windows or CMD + D on Mac to deselect the selection.
Deselecting a Photoshop selection

Center Layers In an Elaborate Document

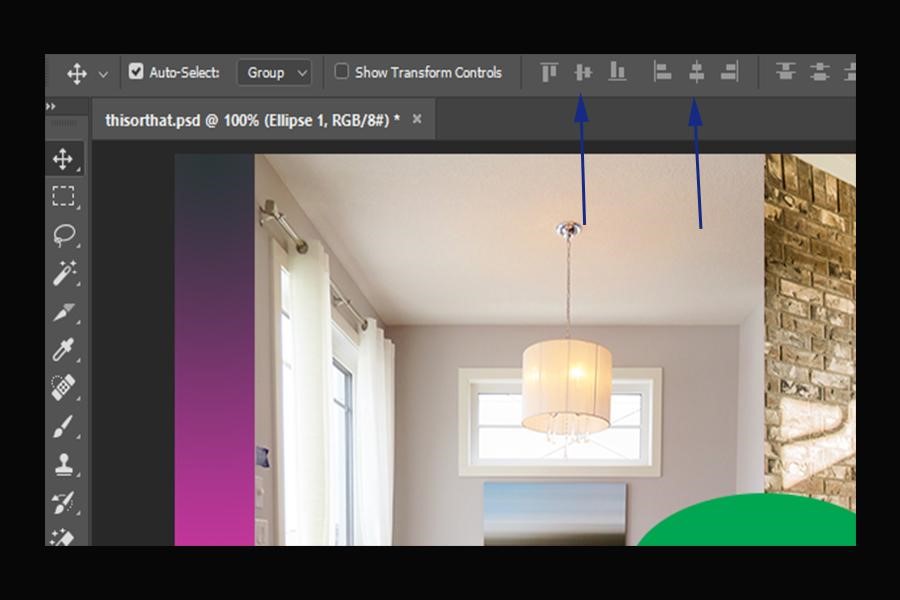
Let me assume I am designing a basic collage post for my real estate Instagram profile. The design has multiple images of interior dining areas, and I need to place my favorite one in the center. To do this, I will use the Layer submenu options to center a layer.

Besides, you also need to work on a contrasting background, image processing, and resizing, but I will discuss that in another post. For now, let me see how to find the specific center point and place one of my layers in that position. 

Create Your Design

  1. Design your post by adding the images
  2. Place an image in the approximate center.
Placing an image in the approximate center in Photoshop

Select the Whole Canvas

  1. Now select the whole document by pressing CTRL + A on Windows or CMD + A for Mac. Alternatively, you can use the Marquee tool to select the entire frame.
  2. Now, from the layers panel, choose the layer that you want to center. 

Use the Move Tool to Center the Layers

  1. Select the Move Tool from the toolbar on the left. 
  2. Go to the Layer menu, hover on the Align Layer to Selection, and select the Vertical Centers and Horizontal Centers.
Using the Move Tool to center the layers

Choose Multiple Layers or Groups to Center Them Together

  1. You can also select more than one layer simultaneously by pressing CTRL/CMD and clicking on the layers, and align them to the center together.
  2.  Deselect the document by pressing CTRL + D (Windows) or CMD + D (Mac).

Center Image Using Customized Keyboard Shortcuts

What if I tell you that the above process can be accelerated even more with a keyboard shortcut?

Although there is no default shortcut to center things in Photoshop, I can always create a new one. You can assign unique key combinations for vertical and horizontal alignment.

  1. Go to the Edit menu, and choose the Keyboard Shortcuts command.
  2. In the dialog box of keyboard shortcuts, select the commands of  Layer > Align Layers to Selection > Vertical centers. Assign key combinations to the command. For instance, you can use ALT + CTRL + 1(Windows) or OPT + CMD + 1 (Mac). 
  3. Do the same for Horizontal Centers and assign a key combination to the command. I used SHIFT + CTRL + 1 (on Windows) or SHIFT + CMD + 1 (on Mac).

Center Image Using Guides

You can find the center area of the image and place your photo, layer, or object over there using guides. Guides are a helpful feature in Photoshop that helps in other processes as well, like splitting the image

  1. Open the image in Adobe Photoshop CC (or create a multilayer document).
  2.  Go to the View menu, and scroll down to the option of New Guide. Click on it.
  3. A dialog box will open up. Click on Horizontal orientation and type 50% in the position box. 
  4. A horizontal line will appear in the middle of the canvas.
  5. Go to the View menu and select New Guide once again.
  6. This time, choose Vertical orientation and input 50% in the position value. 
  7. A vertical line will appear in the middle.
  8. The point where these two guides cross is the center point. You can place your image, object, or any other element here. 
  9. Select the layer which you want to center. Press CTRL + T on Windows or CMD + T on Mac. When the transform mode is active, align the bounding box in the middle of the layer to the crossing point of guides.
Center images in Photoshop using guides
  1. Press enter to close the Transform Mode.
  2. Go to View > Clear guides to remove the guides from the document.

Frequently Asked Questions

Why are the Alignment Buttons Greyed Out in the Move tool?

If you see that the Alignment buttons to center the image are greyed out, the chances are that you haven’t selected the entire canvas.

If you are new to Photoshop, even the simplest tasks can seem confusing until you get the hang of its feature packed interface and standard practices. Until you specify to Photoshop the actual canvas it needs to use to center an object, the alignment options will not be enabled.

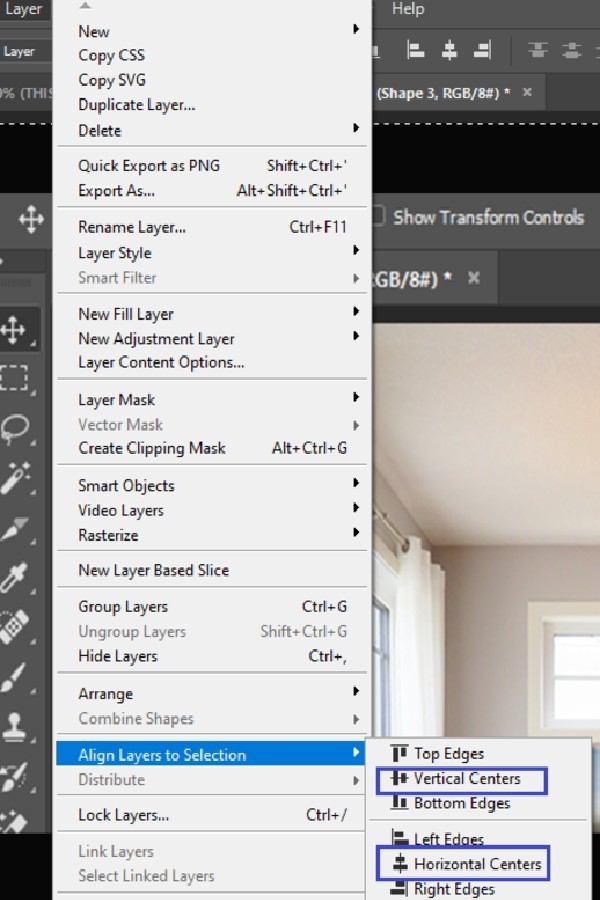
Select All of the active layers by using the Marquee tool selection. Even easier, press CTRL + A (Windows) or CMD + A (Mac). This will tell Photoshop to align the specific layer to the center of the entire document.

Can I Center Multiple Layers and Layer Groups Simultaneously?

Yes, you can. Use the same method of selecting the whole canvas and then using the multi-select Layer option (press CTRL / CMD and select multiple layers or Groups in the layer panel). Use the Move tool and select icons for Horizontal and Vertical alignment to place them in the center of the canvas.

Conclusion

I hope that after reading this tutorial, positioning an image, layer, or object to the center will no more feel challenging to you. Like many other quick and useful features in Photoshop, the alignment tools are also convenient when you quickly want to move anything to the center accurately.

Vendors

Rela Logo
CS6 PSE Logo
HD Photo Hub Logo
FullFrame Logo

Learning Topics

.
magnifiercrossmenucross-circle