PFRE-Logo-white-bg
Reading
blue-triangle-element

Articles

PFRE is the original online resource for real estate and interior photographers. Since 2006, it has been a community hub where like-minded professionals from around the world gather to share information with a common goal of improving their work and advancing their business. With thousands of articles, covering hundreds of topics, PFRE offers the most robust collection of educational material in our field. The history of real estate photography has been documented within these pages.
All Articles
blue-triangle-element

Latest

Image banner for the November 2023 PFRE Photographer of the Month Winner Javier Sotomayor, with a featured image of his winning photo titled "Open"

Congratulations to Javier Sotomayor, November 2023 PFRE Photographer of the Month! The theme this month was "Open." Javier Sotomayor - Entry #879 Dave Koch - Entry #877 Peter Wingfield - Entry #874 Here's what Javier has to say: Hello First of all I wa ...

Contest
blue-triangle-element

OVERVIEW

For over a decade, photographers from around the world have participated in PFRE’s monthly photography contests, culminating in the year-end crowning of PFRE’s Photographer of the Year. With a new theme each month and commentary offered by some of the finest real estate & interior photographers anywhere, these contests offer a fun, competitive environment with rich learning opportunities. 

Contest Rules
blue-triangle-element

CURRENT CONTESTS

View / Submit
blue-triangle-element

PAST CONTESTS

View Archive
Resources
blue-triangle-element

Resources

PFRE prides itself on the depth and breadth of the information and professional development resources it makes available to our community. Our goal is to help real estate and interior photographers be successful while bringing the community together and elevating the industry as a whole.
blue-triangle-element

Conference News

No items found

How to Add Gradient to Text in Photoshop

Published: 24/05/2021

As an Amazon Associate we earn from qualifying purchases.

Colors and effects direct attention to your text and give a lasting impression on your audience. It is good to learn different ways in which you can embellish your text for branding purposes. For instance, you can learn how to add gradient to a text in Photoshop to make it eye-catching and increase the impact of your words. 

How to Add Gradient to Text in Photoshop

Adobe Photoshop CC’s claim to fame is being a powerful, feature-packed software that provides unlimited design capabilities to photographers and graphic designers. It lets you add eye-catching effects to images and allows manipulation to an extensive degree.

However, it is not only limited to graphic elements. As a Photoshop user, you can let loose your creativity even while designing the text areas of your graphics. The gradient is a blending of two or more colors that replaces your text color. Text filled with gradient is more likely to be read rather than plain text, which is why you can use this effect in promotional photos and flyers that you create in Photoshop. 

Like most of the other functionalities of Adobe Photoshop CC, creating a gradient-filled text comes with a lot of flexibility. There are several gradient overlay settings that allow you to portray whatever design you like, and that too quite quickly and easily. Let’s elaborate on the easy process of adding a gradient to text in Photoshop to help you completely grasp the use of this feature.  

Open a Blank Document or an Image

The first step is to create a blank document or open an image in Photoshop, which will act as a canvas for your stylized text. 

  1. Go to the File menu, and click on New for a blank document.
  2. Or, click Open to open an image.

Learn how to install gradients to Photoshop in our guide.

Create Your Text

  1. To create a text layer, select the Horizontal or Vertical Type tool from the toolbar on the left. 
  2. You will see that upon selecting the text tool, you will get an options bar on top which basically determines the font, size, and color of your text. I highly suggest you go for a bolder font for a better appearance of the gradient.
  3. You can also set the style and alignment of text from this toolbar and choose to create warped text.
  4. Once you are done tweaking these settings, drag out a text box in your document and type your text. Click on the checkbox on top.

Adjust Text Size and Position

The size and position of the text box are mostly determined later when you need to adjust it with the other elements. You can choose to set it now or later when your gradient settings are complete. 

Adjust Gradient Overlay Settings

  1. In the layers panel, right-click on the text layer. 
  2. Choose the top option from the drop-down menu that is the Blending Options.
Adjusting Gradient Overlay settings in Photoshop
  1. Or, you can just double-click on your layer to open the Layer Style panel where the blending options are found.
  2. In the panel that opens, you can see a variety of text customization options on the left-hand side. Choose Gradient Overlay among these options.
Choosing a Blend mode for your gradient
  1. Choose a Blend mode for your gradient. I suggest using the Normal option.
  2. Next, set the desired Opacity of the text gradient with the help of the slider. The Dither percentage decides how smooth your gradient blending would be.
  3. Check the Reverse option if you want to change the order of the colors.
  4. Set the angle to determine the starting and finishing point of your gradient. For instance, a 90-degree angle will be chosen for a vertical, linear style gradient.
  5. Adjust the Scale slider to set the smoothness of color transition in the gradient.

Types of Gradient Styles

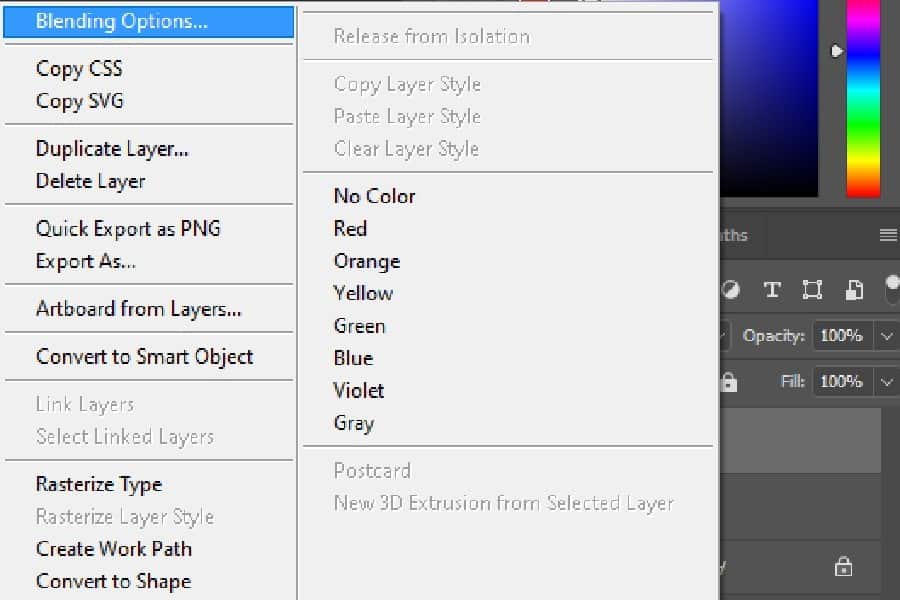
In the Style option for gradient, you will see the linear, radial, angular, reflected, and diamond gradient. This basically determines the gradient appearance.

  • Linear Style: This will make the color blending in a straight line, either vertical, horizontal, or diagonal.
  • Radial Style: This will make a circular blending of the chosen hues.
  • Angular Style: The angular gradient forms a counterclockwise blending of the colors.
  • Reflected Style: The reflected style shows a reflected blending from the middle point, which means that one color will be in the middle and the other on both sides.
  • Diamond Style: In this style of gradient, the shades will blend as if there is a diamond formed in the middle radiating outwards. 

Add A Gradient Overlay To Your Text

Now it’s time to add the gradient to your text. Click on the Gradient box dropdown menu. You will find some pre-designed gradients in different color combinations, which you can choose for your text. Select Ok to commit the Gradient for your text. 

Adding a Gradient Overlay to a text in Photoshop

Create Your Own Gradient

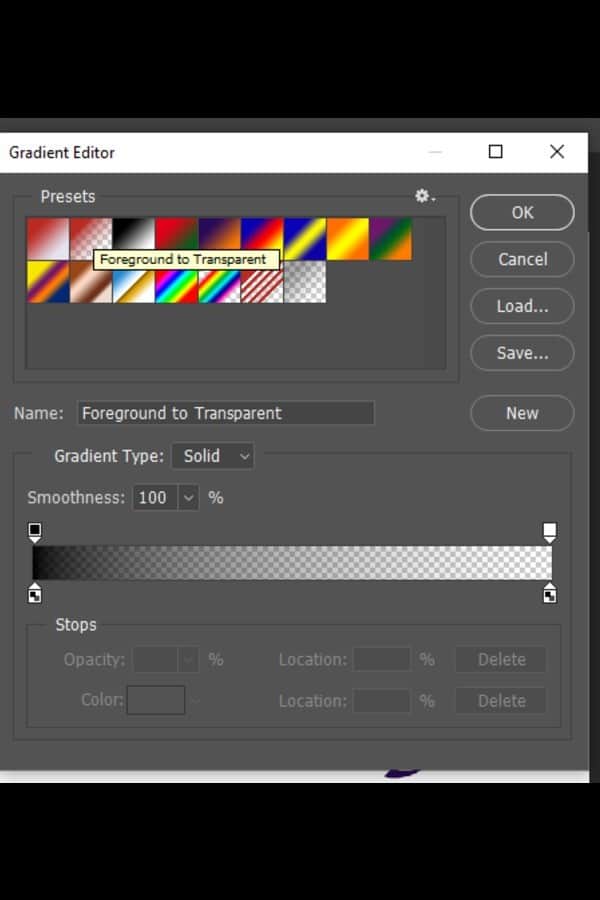
If you don't want to choose any of the given presets for gradients, you can go ahead and create one of your own. The process to do so is very simple.

  1. For further settings of the Gradient according to your choice, you can click on the gradient box to open a new window. Here, you will see a gradient bar with color swatches which you can adjust according to your choice.
  2. Double click on any swatch to change the color or pick a varying hue.
  3. You can also change the position of the swatches to set which color will be more dominant in the gradient.

Transparent Gradient

You can also add a transparent gradient to your text simply by adding a layer mask and using the Gradient tool.

  1. Go to the text layer on the layers panel, and add a layer mask to it by clicking on the Create a Layer Mask icon at the bottom.
  2. Choose the Gradient tool from the toolbar on the left.
  3. On the top, you will get the settings for the Gradient tool. Click on the gradient to open the Gradient Editor box.
Adding a transparent gradient in Photoshop
  1. From the basic presets for gradients, choose Foreground to Transparent gradient.
  2. Click on the OK option.
Foreground to Transparent gradient option in Photoshop
  1. Choose the foreground color as black.
  2. Now select your layer mask and drag it across your text in the document area. Your transparent gradient will be applied to the text.

Conclusion

Enhancing the text with a gradient overlay is a great way to give a bit of artistic flair to your images and positively influence your branding and promotions. Adding a gradient to the text is very easy in Photoshop. With the help of our tutorial, you can try experimenting with this feature to increase the appeal of your text. 

Vendors

Rela Logo
CS6 PSE Logo
HD Photo Hub Logo
FullFrame Logo

Learning Topics

.
magnifiercrossmenucross-circle