PFRE-Logo-white-bg
Reading
blue-triangle-element

Articles

PFRE is the original online resource for real estate and interior photographers. Since 2006, it has been a community hub where like-minded professionals from around the world gather to share information with a common goal of improving their work and advancing their business. With thousands of articles, covering hundreds of topics, PFRE offers the most robust collection of educational material in our field. The history of real estate photography has been documented within these pages.
All Articles
blue-triangle-element

Latest

Image banner for the November 2023 PFRE Photographer of the Month Winner Javier Sotomayor, with a featured image of his winning photo titled "Open"

Congratulations to Javier Sotomayor, November 2023 PFRE Photographer of the Month! The theme this month was "Open." Javier Sotomayor - Entry #879 Dave Koch - Entry #877 Peter Wingfield - Entry #874 Here's what Javier has to say: Hello First of all I wa ...

Contest
blue-triangle-element

OVERVIEW

For over a decade, photographers from around the world have participated in PFRE’s monthly photography contests, culminating in the year-end crowning of PFRE’s Photographer of the Year. With a new theme each month and commentary offered by some of the finest real estate & interior photographers anywhere, these contests offer a fun, competitive environment with rich learning opportunities. 

Contest Rules
blue-triangle-element

CURRENT CONTESTS

View / Submit
blue-triangle-element

PAST CONTESTS

View Archive
Resources
blue-triangle-element

Resources

PFRE prides itself on the depth and breadth of the information and professional development resources it makes available to our community. Our goal is to help real estate and interior photographers be successful while bringing the community together and elevating the industry as a whole.
blue-triangle-element

Conference News

No items found

How to Make Presets on Lightroom

Published: 19/04/2021

As an Amazon Associate we earn from qualifying purchases.

Photo processing can quickly become a tedious task if you are dealing with a large number of photos and want to achieve the same look on every shot. Lightroom Presets make it a breeze to edit several photos quickly. Learning how to make presets on Lightroom can help you apply changes to multiple images and spend less time editing and more time shooting. 

How to Make Presets on Lightroom from Scratch

Presets are Lightroom’s version of filters. They are a set of editing adjustments that quickly transform an image the way you like. Presets are great for beginners who are yet to have their own editing workflow figured out, or for influencers who create a consistent look on their social media feed, and also for photographers who frequently do batch editing.

Lightroom Classic allows you to create your own real estate lightroom preset. It is an easy process that you can do even if you are not much familiar with the Develop module settings. Below I will walk through the procedure of making a preset which you can then apply to as many images as you want.

Once you create your preset, it will stay in the Presets tab under the Navigation panel for easy access. You can also go ahead and export your preset if you want to share it with friends who use Lightroom or sell it. 

Set a Clear Priority on the Type of Preset You Want to Create

The first step to make a preset is to decide what kind of editing styles you’re planning to create. For instance, you may want to make a preset that gives retro vibes to your photos. Or, you may want to save adjustments to give a dark or moody tone to the images.

Once you are clear about the type of preset you want to create, you can get started.

Import a Photo

  1. Launch Adobe Lightroom Classic CC and make sure you are in the Library module.
  2. On the left-hand side, click on the Import button.
  3. Browse your image collections to import a photo that needs the kind of adjustments you are about to make. 
  4. Click on Import.
  5. Double click on the image thumbnail in the Grid to open it. 
Importing a photo in Lightroom

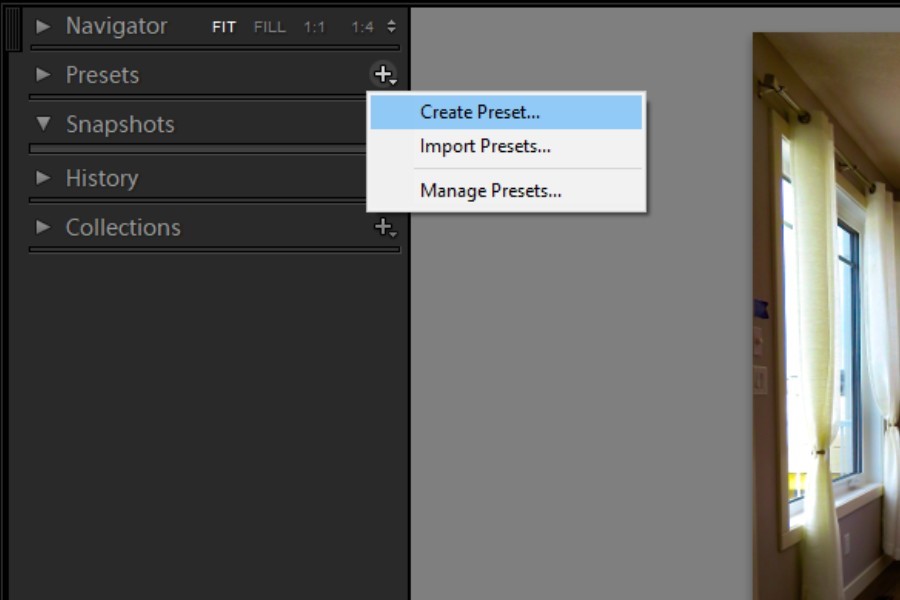
Your work in the Library module is now complete. Now head on to the Develop module to edit this photo and create your preset.

Edit the Photo

There are nine panels with an array of sliders, tools, and adjustments in the Develop module that help you edit an image. Adjustments from all these panels can be saved in the form of the preset. Learning how to use the Develop module will help you process photos like a pro.

  1. Go to the Develop Module.
  2. From the Basic panel, you can alter the tone, saturation, exposure, and white balance of the image.
  3. To modify the tone and colors of the image, you can adjust the Tone Curve and HSL/Color sliders.
  4. The next panel is the Color Grading panel, which lets you tweak special color effects.
  5. The Details panel allows you to change sharpness and noise, whereas the Lens Correction will let you rectify mistakes on the image caused by the camera.
  6. The Transform panel adjusts the distortions, and the Effects panel enables you to apply a vignette, haze, fog, or grain to your photo.
  7. The last one is the Calibration panel which lets you modify camera adjustments. 

The image of this dining room was taken in broad daylight. I'll edit it in a way that it appears dim-lit, similar to the the effect I get in the evening.

Editing photo in Develop Module before creating a preset in Lightroom

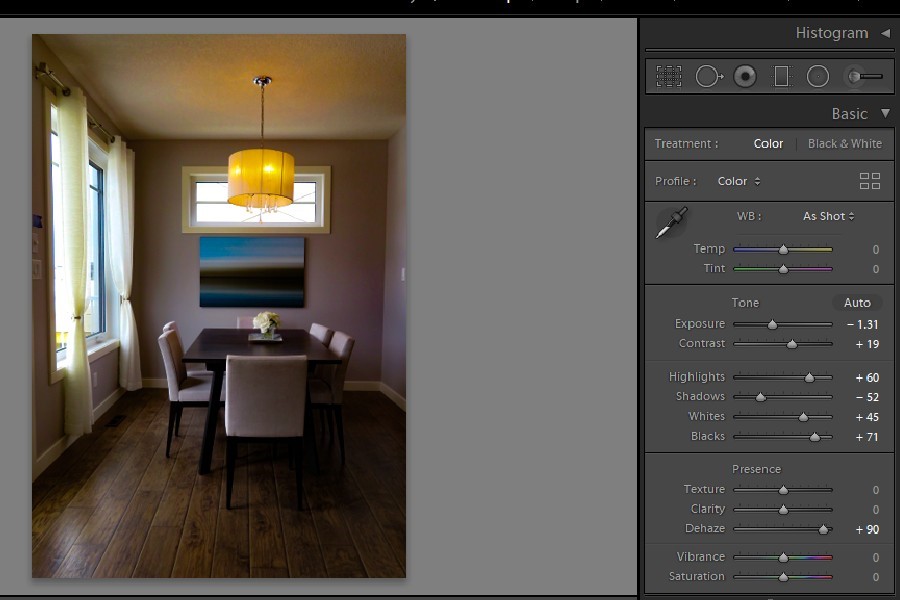
You can see that the tweaks we made gave us the desired effect. We can now go on and save my settings as a preset.

Create the Preset 

  1. On the left-hand side, look for the Presets tab under the Navigation panel.
  2. Click on the + icon besides Presets.
  3. Choose to Create a Preset.
Option to create a preset in Lightroom
  1. A dialog box will open up with all the checkboxes present, showing you which editing settings you want to save.
  2. I recommend selecting only the adjustments that you have made. Do not select the white balance checkbox as every image may require a different color temperature adjustment. 
Editing settings dialog box when creating a Lightroom preset

Choose a Name for the Preset

  1. Think of a name for your preset that explains the kind of effect it will give.
  2. If you are making more than one preset with a few changes in effects, add a similar word at the start of each of their name. For instance, “Dim lit interior-yellow tone” and “Dim-lit interior-bluish tone.”
  3. Choose a folder or create a new one for better organization of your presets tab.
  4. Click on Create.
Choosing a name for your Lightroom preset

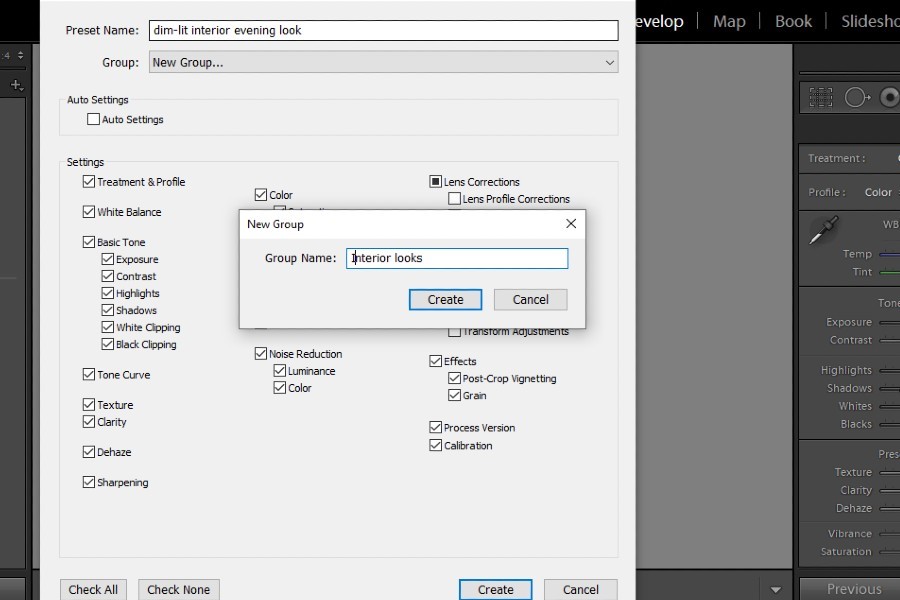
Bravo! You just made one of your own preset!

Export the Preset

It is up to you whether you want to create presets for your own use or for sharing and selling purposes. If you intend to share it, you will need to export it from Lightroom.

In Lightroom Classic CC, just right-click on the preset in the Presets tab and click on Export. Select the file location from the popup window and hit on Export

Use Your Presets in Lightroom

After making your preset in Lightroom, applying it to other images is very simple. 

  1. You can either set your preset as a default preset in Apply During Import option in the Import settings.
  2. You can apply the preset on single and multiple images in the Library module by selecting your preset in the Quick Develop panel’s Saved Preset option.
  3. In the Develop module, simply hovering your cursor over the preset in the Preset tab will show you how it looks on your selected image. Click on the preset to apply it.
  4. You can check the before and after view by clicking on the YY button available above the filmstrip view in Develop module.

Why You Should Create Your Own Presets

There are three main reasons why creating presets might be useful for you.

  1. Presets accelerate your production workflow. In a matter of few minutes, you can batch edit a large number of photos like a pro.
  2. It helps you give similar effects to a photo collection creating a uniform look. 
  3. Making presets and selling them is a great way to make money. Some Instagrammers are making a fortune just by selling presets. Followers and fans who want a particular influencer’s look buy these presets to get similar effects on their photos.  

Takeaway

Lightroom presets provide absolute functionality in the photo editing process. It is worth creating presets yourself which are unique to your editing style and vision. I hope the above tutorial will guide you through the process of designing a Lightroom preset of your choice with ease.

Vendors

Rela Logo
CS6 PSE Logo
HD Photo Hub Logo
FullFrame Logo

Learning Topics

.
magnifiercrossmenucross-circle